 |
||
| > Reader's Photo OX5 by Lockheed Martin |
||
 |
||
| • ADVERTISE WITH US | ||
| • WHO IS MOAB JEEPER? | ||
|

Home > Jeep Articles > Technical & Installation - Body Interior / Exterior > Olympic A/T Slider Rear Bumper (Install) |
||||||||||||||||||||||||||||||||||||||||||||||||||||||
 |
||||||||||||||||||||||||||||||||||||||||||||||||||||||
|
Olympic A/T Slider Rear Bumper (Install)Article written by Moab ManDate Added: 11/08/2009 If you?ve seen my Jeep, Barney, you will have noticed that in ten years of ownership I have never changed from my stock rear bumper... until now. |

|
 As a magazine, plenty of opportunities have come along for a new bumper. But many aftermarket bumpers are either stubby in width, or so big and heavy they look more appropriate on a tank. As a magazine, plenty of opportunities have come along for a new bumper. But many aftermarket bumpers are either stubby in width, or so big and heavy they look more appropriate on a tank. Alas, I have finally moved from my stock rear bumper and on to the Olympic A/T Slider Rear Bumper. Why this bumper? First off it?s light weight. And like a fat kid trying to climb a rope ladder, weight matters. Second is the protection the Olympic A/T Slider Rear Bumper offers. Most aftermarket bumpers are narrow in width. While this looks really good, it affords the soft sheet metal corners of your Jeep no protection against a simple corner bump, let alone a full-on ?Eagle has landed? drop on to the sharp unforgiving solidness of a boulder. |
||||||||||
|
Installation | |||||||||||
|
1. Remove the plastic extensions from your stock bumper. They are held in place by Allen head screws (top and bottom of the bumper). |
||||||||||
|
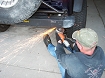
2. Unfortunately, from years of grinding rocks on these plastic extensions, ours would no longer unscrew. So we used a grinder to take the Allen heads off. |
||||||||||

|
3. Remove the plastic bumper extension. |
||||||||||
|
4. Unbolt the bumper tabs from your frame. These tab bolts are to be used with the new bumper, but we replaced ours with new hardware due to corrosion. These tab bolts are to be used with the new bumper, but we replaced ours with new hardware due to corrosion. |
||||||||||
|
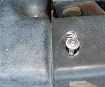
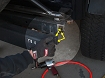
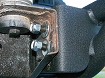
5. Unscrew the two nuts that attach your bumper to the sheet metal cross member. The bolts are welded to your factory bumper. |
||||||||||
|
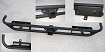
6. Here is your Olympic A/T Slider Rear Bumper with integrated receiver. |
||||||||||
|
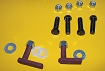
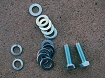
7. Mounting hardware is provided. |
||||||||||
|
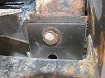
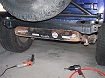
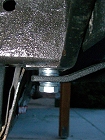
8. With the factory bumper removed, it is time to install your Olympic bumper. This is what the rear of a TJ will look like. |
||||||||||
|
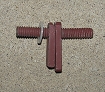
9. First, install the plastic ring onto the L-bracket bolt. This is to prevent the L-bracket from falling into the cross member. |
||||||||||
|
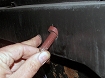
10. Next install the L-bracket into the cross member? however, we hit a couple snags. As you can see from the picture the L-bracket would not fit through the hole in the cross member. |
||||||||||
|
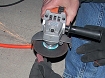
11. Using our handy grinder from earlier ? grind the corner edge of the L-bracket to allow it to make the turn when inserting through the cross member. |
||||||||||
|
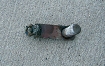
12. Which brings us to our second issue ? The L-bracket was not long enough. The idea is that when you tighten down the nut, the bracket will spin and the arm will catch the top of the sheet metal cross member holding it in place. Our quick fix? we welded a nut on the end of the brackets. Understanding not everyone has access to a welder, you could use JB Weld to attach a nut or some other metal extension, but it does require 24 hours curing time to be at full strength. |
||||||||||

|
13. With the L-bracket issues resolved, mount the rear bumper to your vehicle using a flat washer and a nylock nut. Don?t tighten it down yet! Other bolts need to be installed and adjustments made. |
||||||||||
|
14. Bolt the outer ends of the bumper to the cross member using the provided bolts/nylock nuts.
**Additional hardware - two flat washers used on each bolt. |
||||||||||
|
15. Secure the tabs to the bottom of your frame and now tighten all bolts.
**Additional hardware - three flat washers used between frame and tab, one flat washer and one lock washer between bolthead and tab. |
||||||||||
|
Installation IssuesHardware ? The L-brackets presented two issues. First, the bar steel was not long enough to catch the top or bottom of the cross member and stop the bolt from spinning when tightening. Our two L-bracket steel bars were different lengths and neither of them long enough.The fix was to pull out the welder and simply attach a nut to get the length we needed. If you don?t have a welder some good ole trusty JB Weld will do the trick. Downside is the installation of this L-bolt (and the bumper) will be delayed 24 hours while the JB Weld fully cures. Second issue with the L-bracket, which we actually discovered first, is that we couldn?t put the L bolts in. Trying to make the corner caused the bar steels corner to catch. Our fix was to take a grinder to the corner and round it off. Additional hardware ? We purchased bolts and washers from our local hardware store. The washers were to prevent boltheads/nuts from chewing into the bumper, replacement bolts due to original tab bolts being corroded, and lock-washers to keep the new tab bolts in place. A better choice for the lock-washers would be some Loctite®. |
||||||||||
|
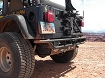
Final ThoughtsProtection - Most important, not only does the bumper go full width, but it wraps around and under the corners of the Jeep all the way to the wheel well. This is FULL protection from both the sides and the under side.Attachment ? Besides using all of the standard mounting points of the stock bumper, Olympic has created their own L-brackets (our name not theirs) to utilize the holes in the backing plate on the rear of the Jeep. Of course, the backing plate is only sheet metal, but the more bolted connecting points the stronger the overall mounting of the bumper. It also helps to minimize deflection of the bumper from extreme impacts or loads. Receiver ? This bumper has an integrated hitch which may or may not be useful to you. I like it because it raised the hitch point by six inches over a stock receiver. This allows me to use my cargo carrier and go off-road without hitting the carrier in most situations. Consequently, others may find the receiver is too high and need a drop hitch. The bumper did have some installation issues. However, none of them were too serious, and with the suggested additional hardware and modifications the installation could be flawless. Next week we will review our Olympic A/T Slider Rear Bumper after months of abuse in Moab, Utah. |
||||||||||
Purchase / Vendor Info
|
| Vendor Name: | Olympic 4X4 Products |
| Address: | 2645 S. Yates Ave City of Commerce, CA 90040-2621 |
| Phone: | 323-726-6988 |
| E-Mail Address: | |
| Website: | http://www.4x4products.com/ |
