 |
||
| > Reader's Photo OX5 by Lockheed Martin |
||
 |
||
| • ADVERTISE WITH US | ||
| • WHO IS MOAB JEEPER? | ||
|

Home > Jeep Articles > Technical & Installation - Suspension > Rock Krawler X-Factor Heavy Duty Steering |
||||||||||||||||||||||||||||||||||||||||||||||||||||||||||||||||||||||||||
 |
||||||||||||||||||||||||||||||||||||||||||||||||||||||||||||||||||||||||||
|
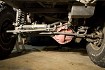
Rock Krawler X-Factor Heavy Duty SteeringArticle written by TrollDate Added: 05/18/2009 Here at MOABJEEPER Magazine, we give a lot of good advice; however, we are not always smart enough to heed our own words. |
 As the resident staff newbie, the Troll got it in his head that he was smarter than the veterans by not airing down his tires, or disconnecting his sway bar. He then (in his infinite rookie wisdom) decided to throw the full weight of the vehicle into the side of a tire while venturing through a large boulder field, ultimately ending in catastrophic steering failure. The final result of this flawed thinking was a defeated Troll dragging his Hammer through the mud back to his cave. As the resident staff newbie, the Troll got it in his head that he was smarter than the veterans by not airing down his tires, or disconnecting his sway bar. He then (in his infinite rookie wisdom) decided to throw the full weight of the vehicle into the side of a tire while venturing through a large boulder field, ultimately ending in catastrophic steering failure. The final result of this flawed thinking was a defeated Troll dragging his Hammer through the mud back to his cave.
|
|||||||||||||
|
Installation | |||||||||||||
|
1. Preparation: Not required, but strongly suggested. Soak all of the nuts and bolts of your stock tie rod, drag link, track bar, and pitman arm with PB Blaster the night before. Doing so will save you time, and you WILL wish you had done it if those factory components have any age/corrosion. |
||||||||||||

|
2. Tool rental: Go to your local auto parts store that offers free tool rental, and pick up a pitman arm puller, tie rod end puller, and pickle fork of appropriate size. |
||||||||||||
|
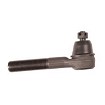
3. Purchase: You will need a new tie rod end that fits your factory drag link. Rock Krawler?s X Factor Heavy Duty Steering upgrade reuses the factory end. Having the front end taken apart this far, we would never reuse old components. |
||||||||||||
|
4. Loctite: Jeeps seem to vibrate all the time, whether they are standing still or rolling down the highway at 60mph. We recommend using blue Loctite on all bolts and jam nuts throughout this installation. On the drag link jam nuts, Rock Krawler recommends the use of red Loctite. Seriously, use Locktite on every bolt. We missed a couple, and they were loose after only a few hundred miles. Seriously, use Locktite on every bolt. We missed a couple, and they were loose after only a few hundred miles. |
||||||||||||
|
5. Break the front wheel lug nuts loose, support the front axle on jack stands, and now remove the front wheels.  For your own safety; please chock the rear tires and set the emergency break. For your own safety; please chock the rear tires and set the emergency break. |
||||||||||||
|
6. Remove the steering stabilizer. |
||||||||||||

|
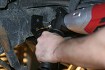
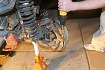
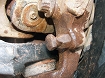
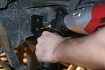
7. Disconnect the pitman arm from your steering gear box. Remove the nut, place pitman arm puller over the pitman arm, and tighten the puller. Eventually, under lots of pressure, the pitman arm will finally and suddenly let go. It helps to give the pitman arm a hit with a hammer from time to time to help jar it loose. Be mindful that there are bearings inside the steering box you don't want to damage. Sometimes the pitman arm puller will break while under a lot of pressure. We suggest wearing some safety lenses. Sometimes the pitman arm puller will break while under a lot of pressure. We suggest wearing some safety lenses.A little tip we have found useful. We will place a clamp on the outside of the pitman arm jaws. This helps to prevent the jaws from opening under pressure. |
||||||||||||
|
8. Remove the cotter pins and castle nuts from your tie rod ends. Using an appropriate sized pickle fork (or tie rod puller), separate the tie rod ends from your steering knuckles. There is no need to separate the drag link from the pitman arm or tie rod, as this is all going to be scrap (or spare parts for someone else). |
||||||||||||
|
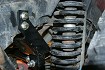
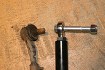
9. Remove cotter pin and castle nut from your track bar connection at the frame. Now use the pickle fork to separate the track bar from the frame. |
|||||||||||||

|
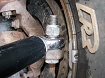
10. Unbolt the track bar from the axle. The nut on the back side is welded to a small bracket to keep it from rotating. |
||||||||||||
|
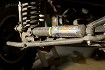
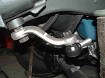
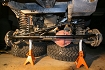
11. With all the stock components out of the way, it's time to install the Bomb Proof Track Bar and bracket on the vehicle. |
||||||||||||
|
12. Using the Bomb Proof track bar bracket as a template, drill 2 holes in the frame to fasten the bracket into place. Drilling the 2 holes in the side of the frame is easy enough to do from the outside of the frame, but the spacing on the back side of the frame is too tight for a regular drill to fit in the space. We opted to drill all the way through the frame from the one side. Using this method entails a very steady hand and no deviation between the positioning of the holes from one side of the frame to the other. If you have an air drill available, we would suggest measuring the inside of the frame to match the hole positions on the outside and using the small air drill to make the inner holes. This step is a measure twice, or more, and drill once. |
||||||||||||
|
13. Once the holes are drilled in the frame, attach the supplied track bar bracket to the frame with accompanying hardware. |
||||||||||||
|
14. Attach the frame end of the track bar to the newly installed bracket using the accompanying hardware. |
||||||||||||
|
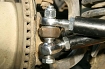
15. Attach the axle end of the track bar to the factory bracket. Attaching the track bar to the factory bracket can be a challenge, as you will need to hold onto the nut with a wrench while ratcheting the bolt through the track bar. There is very little space on the back side of the bracket, and an open end wrench did not fit onto the nut. To overcome this, we opted to use a pair of needle-nose vice grips, which fit perfectly into the small hole on the back of the bracket to hold the nut. |
||||||||||||
|
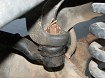
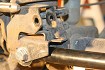
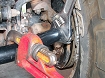
16. Drill out the factory holes in the steering knuckles with a 5/8 diameter drill bit. We recommend using a variable speed drill with a side handle. We first attempted to drill the holes without the side handle and nearly broke our wrists in the process. Make sure you drill through the thick steel knuckles with a slow rpm, and use a drill bit designed to drill through metal. |
||||||||||||
|
17. Turn the hiem joints on the ends of the tie rod out approximately 1/4" to 1/2" on each side, and tighten down the jam nuts. It is a good idea to approximate the length of the tie rod with the hiem joints based upon the length of the factory tie rod and drag link assembly you removed. This will get the toe-in as close as possible with the new tie rod before having the alignment done. |
||||||||||||
|
18. Attach the tie rod to top side of the driver side steering knuckle with the supplied hardware. |
||||||||||||
|
19. Attach the other end of the tie rod to the top of the passenger side steering knuckle and the hiem end of the drag link to the bottom (yes, the bottom) of the passenger side steering knuckle with the supplied hardware. Do NOT tighten the jam nuts on the ends of the drag link at this point. |
||||||||||||
|
20. Slide on the lock collar, and thread the tie rod end into the drag link. Leave 1/2" of thread exposed to allow room for adjustment. |
||||||||||||
|
21. Attach the tie rod end to the pitman arm, and secure it with a castle nut and cotter pin. Do not tighten the locking collar on the drag link until you center the steering wheel. Once the steering wheel is centered, you can then tighten the collar as well as the jam nut on the axle end of the drag link. |
||||||||||||
|
22. Turn the steering wheel the entire way to one side and re-tighten the jam nuts on the ends of the tie rod. |
||||||||||||
|
23. Replace the factory steering stops with the ones supplied with the kit. |
||||||||||||
|
24. Take your vehicle to a professional alignment shop and have it aligned properly. Even though you might be able to drive without a proper alignment, doing so will ultimately lead to uneven and premature tire wear. |
|||||||||||||
|
Installation IssuesThe main issue we ran into dealt with drilling the holes through the frame for attaching the track bar bracket. We overcame this issue by being very careful about how we ran the second hole through the back side of the frame to make sure the holes lined up through both sides properly.Another issue we ran into was with the hiem "spacers" referred to in the official product installation manual, which are to be installed between the steering knuckles and the hiems. We thought at first that the spacers were missing from our kit, but after talking with Jeremy at RockKrawler, we were informed they discontinued the use of the spacers and they are no longer needed. The confusing part to us is the inclusion of the spacers in the current installation manual. The third and final issue we had with the installation was Step 13 missing from the installation manual. In the "Hints for tightening jam nuts" section, there is a bold line stating, "after performing step 13." We have no idea what Step13 is since it is not in the manual, but it seems to be an important one as it is called out in bold typeface. |
||||||||||||
|
Final ThoughtsThis steering setup is definitely heavy duty, and we would have no problem with once again attempting to support the vehicle's weight on the side of one tire. The super beefy 26 pound tie rod looks well up to the task. Time will tell if the Troll is able to destroy this heavy duty setup, but his odds aren?t looking good. |
||||||||||||
Purchase / Vendor Info
|
| Vendor Name: | Rock Krawler Suspension Inc. |
| Address: | 15 Albany Ave Green Island, NY 12183 |
| Phone: | 518-270-9822 |
| Contact Person: | Jeremy |
| E-Mail Address: | |
| Website: | http://www.rockkrawler.com |
