 |
||
| > Reader's Photo OX5 by Lockheed Martin |
||
 |
||
| • ADVERTISE WITH US | ||
| • WHO IS MOAB JEEPER? | ||
|

Home > Jeep Articles > Technical & Installation - Suspension > Factory Track Bar Maintenance |
||||||||||||||||||||||||||||||||||||||||||||||||||||||||||||||||||||||||||||||||||
 |
||||||||||||||||||||||||||||||||||||||||||||||||||||||||||||||||||||||||||||||||||
|
Factory Track Bar MaintenanceArticle written by Icky & Moab ManDate Added: 03/01/2009 Performing an exorcism on our Jeep, "Monkey Spank" |
|
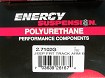
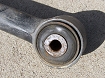
 If you haven't experienced Death Wobble, consider yourself fortunate. This demon possession of (typically) coil sprung solid axle front ends is not limited to just big Jeeps with big tires. Stockers, and relatively stock Jeeps can also be victims. While there are a number of things that can contribute to, or cause death wobble, one of the most common culprits is the front track bar. Specifically the axle end. If you haven't experienced Death Wobble, consider yourself fortunate. This demon possession of (typically) coil sprung solid axle front ends is not limited to just big Jeeps with big tires. Stockers, and relatively stock Jeeps can also be victims. While there are a number of things that can contribute to, or cause death wobble, one of the most common culprits is the front track bar. Specifically the axle end.Before we go further, if you're not familiar with Death Wobble, let me explain. You're driving down the road and pass 40-45 mph and your steering wheel starts to pulse back and forth. As you push through 50-55 mph it seems to go away. This is the mild case, but don't worry, in time you will get the full experience if ignored. Now lets ignore this little pulse, as we did, and jump ahead some time to say... last week. Only this time as you accelerate past 40-45 mph the back and forth movement of your steering starts to get violent. Driving through it, as you always have in the past, the front end of your Jeep literally starts to jump up and down drivers side passenger side drivers side etc... If you're smart, you back down and it all settles. Of course you wonder what in the hell just possessed your Jeep. Congratulations! You now have a full blown case of DEATH WOBBLE. So how do you exorcise the demon that has taken up residence in your front axle? First problem is the factory rubber bushing. Over time the rubber breaks down and no longer holds the axle solidly in place against lateral movement. Add to it, the cheap steel of the factory bolt holding it all in place. Water gets in the bushing and corrodes the bolt. Combining these two factors and the axle will move quite a bit side-to-side before the track bar puts up any kind of resistance. And the resistance offered is too little too late. To chase away our demons, we replaced the bushings in our factory track bar with some high quality polyurethane bushings from Energy Suspension. If you're wondering why we still have the factory track bar, it's because our Jeep "Monkey Spank" is relatively stock on just a 2.5" lift. This small amount of lift doesn't require a change of track bar, but it does increase the strain on our already inadequate, worn out stock bushings. To replace the bushings in our factory track bar, we ordered Energy Suspension part# 2.7102G. |
||||||||||
|
Installation | |||||||||||
|
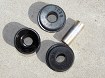
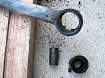
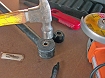
1. Contents: Two polyurethane bushing halves, ball joint boot, bushing sleeve, and bushing grease. |
||||||||||
|
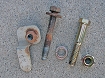
2. Purchase: The bushing kit is intended to be a direct replacement for the factory bushings; however, the factory track bar bolt is a little small for the provided bushing sleeve. For this reason we strongly recommend you purchase a 7/16" - 2 1/2" replacement bolt, lock washer, and nut. |
||||||||||
|
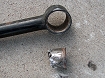
3. Remove the cotter pin, and hit the castle nut with some PB Blaster to help break loose the rust-weld in the nut. Let it sit for now. |
||||||||||
|
4. The replacement sleeve has a slightly thin-and-uneven inner diameter of 7/16". We cleaned it up on the drill press to an even 7/16". Don't try and hold the sleeve with your fingers. Don't try and hold the sleeve with your fingers. |
||||||||||

|
5. Remove the castle nut. Use a six point socket. The castle nut is not very strong. Use a six point socket. The castle nut is not very strong. |
||||||||||
|
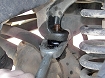
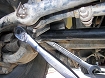
6. Using a pickle fork and a baby sledge, separate the ball joint from the frame mount. Lay a bar across the top of your tie rod and axle. The bar will catch the track bar once it's broken free and drops. |
||||||||||

|
7. Depending on how long the track bar has been in place, this may take a while. Keep at it; eventually the track bar will let go. |
||||||||||
|
8. We got lucky, the pickle fork didn't shred the ball joint boot, and we won't need to use the replacement boot. |
||||||||||
|
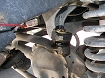
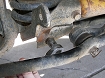
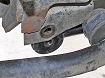
9. Unbolt the axle end of the track bar. On the backside of the bolt is a nut welded to a bracket. The bracket prevents the nut from turning. |
||||||||||
|
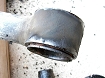
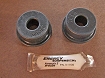
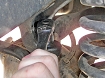
10. Here is the offending bushing. Visually the bushing looks to be in great shape, but when it was on the vehicle under load the track bar moved laterally 3/8".
|
||||||||||
|
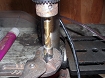
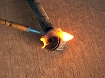
11. The factory bushing does not come out of the factory track bar without putting up a fight. There are two methods for removing this bushing. First (and not very efficient) drill the rubber and turn it into Swiss cheese. Second, and our preferred method... use a propane torch and burn the bushing out. Once the bushing is "well done" the inner steel sleeve can be knocked out along with the bushing. Burning the bushing will release toxic fumes. If you burn the bushings do it in a well ventilated area outside. Burning the bushing will release toxic fumes. If you burn the bushings do it in a well ventilated area outside. |
||||||||||
|
12. With the bushing out of the track bar, the hard work begins. |
||||||||||
|
13. Factory bushing are contained within a metal sleeve and pressed into the track bar. The previous step of removing the rubber bushing is to get to this metal sleeve. |
||||||||||
|
14. This is a good point to get some lunch going. The next step can take about a half hour. |
||||||||||
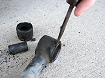
|
15. Use a screwdriver that you can destroy, or a chisle, to collapse the inner sleeve. We used a screwdriver because it was thin enough to get between the sleeve and the track bar. |
||||||||||
|
16. It's an ugly process ripping the sleeve apart to get it out of the track bar. Try not to cut up the inner surface of the track bar when removing the bushing sleeve. |
||||||||||

|
17. Fatigue sets in... the sleeve will not come out of the track bar without putting up a fight. Keep at it. |
||||||||||
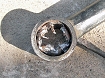
|
18. Success at last. As you can see we ripped up the bushing sleeve pretty good. |
||||||||||
|
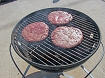
19. Good timing; the burgers are done. |
||||||||||
|
20. Polyurethane can be squeaky. For this reason Energy Suspension provides a special grease with their bushings. This is the tackiest grease you will ever use. Whatever it touches it sticks to like pine tree sap. This quality keeps the grease in place when other greases would wash away. |
||||||||||
|
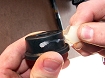
21. Put a little grease on the bushing, and smear it all the way around the outside. |
||||||||||

|
22. After ensuring you have no burrs inside the track bar, smear the Energy Suspension grease in there.
Use a round file if necessary to de-burr the track bar. |
||||||||||

|
23. Press the bushings into the track bar. |
||||||||||

|
24. Lubricate the inner sleeve, and press it in. |
||||||||||
|
25. We used a hammer to finish seating the sleeve. |
||||||||||
|
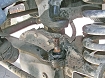
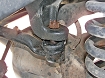
26. Reinstall the axle end of the track bar. |
||||||||||
|
27. Use the replacement hardware. Lock washer and nut will go inside the pocket that originally contained the factory nut/bracket.
Use the box end of a wrench to hold the nut in place while you tighten the bolt. |
||||||||||
|
28. Put the frame end of the track bar in place and start the castle nut. |
||||||||||
|
29. Using a six point socket, tighten the castle nut. As you finish tightening the nut, you will have to align the cutouts in the nut with the cotter pin hole. Reinstall the cotter pin. |
||||||||||

|
Installation IssuesThe factory track bar bolt is thin and should not be used with the replacement bushing. Over time the poor fit will cause the bolt to wallow out the new sleeve and the holes in the mounting bracket on the axle. Worse, your Death Wobble will likely still be there since you didn't get rid of all the slop at your axle.We suggest to Energy Suspension; add a small slip of paper recommending the replacement of the factory bolt/bracket nut with our above specified hardware. As for the provided sleeve, don't change a thing. Leave it to the end user to drill out the sleeve for an exact fit. |
||||||||||
Final ThoughtsReplacing the factory bolt with a Grade 8, 7/16" - 2.5" bolt made our track bar fit better than it did off the assembly line. There are a few reasons for this.1. The holes in the axle end mounting bracket are already drilled to 7/16" which the factory bolt did not fill. 2. Drilling out the Energy Suspension provided sleeve to 7/16" gave a very exact fit with no play. 3. Polyurethane bushings don't compress like rubber does. Put all three of these items together, and there is NO slop at the axle. A quick test drive at the end confirmed we sucessfully exorcised our death wobble demons.
|
|||||||||||
Purchase / Vendor Info
|
| Vendor Name: | Energy Suspension |
| Address: | 1131 Via Callejon San Clemente, CA 92673-6230 |
| Phone: | (949) 361-3935 |
| E-Mail Address: | |
| Website: | http://www.energysuspension.com/ |
