 |
||
| > Reader's Photo OX5 by Lockheed Martin |
||
 |
||
| • ADVERTISE WITH US | ||
| • WHO IS MOAB JEEPER? | ||
|

Home > Jeep Articles > Technical & Installation - Body Interior / Exterior > RunCool Hood Louvers |
||||||||||||||||||||||||||||||||||||||||||||||||||||||||||||||||||||||
 |
||||||||||||||||||||||||||||||||||||||||||||||||||||||||||||||||||||||
|
RunCool Hood LouversArticle written by Thomas BroermanDate Added: 10/03/2011 Run Cool and look cooler. |

|
It goes without saying that we?ve had our share of Jeeps over the years. And with a large variety of Jeeps comes a large variety of issues. We?ve had incurable death wobble, persistent driveline vibrations, squeaks and clunks that just can?t be found, wheels falling off, and of course overheating. Well, the folks at RunCool say they can cure at least one of our problems (yes the overheating). So follow along as we install a set of large hood louvers on our V8 Jeep Grand Cherokee. |
||||||||||
|
Installation | |||||||||||
|
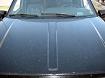
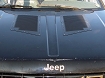
1. Start with the bare hood. This is a good time to take a picture because it will never look the same. |
||||||||||
|
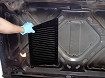
2. Clean the hood with your favorite blue window cleaner. |
||||||||||
|
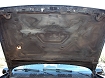
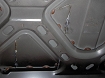
3. Open the hood. If you have an SUV type Jeep (Cherokee, Grand Cherokee, etc?) you?ll probably have this hood insulating sheet on the inside. |
||||||||||
|
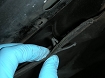
4. Remove the sheet by carefully pulling the plastic tabs holding it in place. |
||||||||||
|
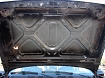
5. With the sheet removed, it?s easy to see the structure of the hood. We?re going to leave the structure of the hood in place figuring we?ll get plenty of air flow around the braces. Cutting through all the ribs would seriously weaken the hood of our Grand Cherokee.
As you can see, we are going to have a lot of bracing to work around when we cut the holes in the hood. |
||||||||||
|
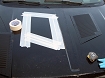
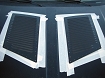
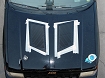
6. Place the louvers on the hood where you want them to be. Take some time to play with the positioning until you get the look you want. |
||||||||||
|
7. Before you totally fall in love with the placement of the louvers, be sure to check under the hood to see if you picked a good spot. You can really put them about anywhere, but we tried to position ours over the largest open space between hood braces. |
||||||||||
|
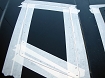
8. Once you have figured out where you want the louvers, tape off the area around them with masking tape. You want plenty of overlap inside and ouside of the louvers for making the marks in the next few steps. |
||||||||||
|
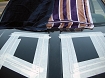
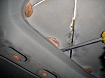
9. Again tweak the position of the louvers until you get the look you want. Mark the corners of one louver. |
||||||||||
|
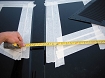
10. Measure from the side of the hood to the marks, and use those measurements to exactly match the position of the other louver.
|
||||||||||
|
11. Take your time and make sure they are exactly the same and exactly where you want them. You?re about to cut some really big holes in your Jeep; make sure it?s right. |
||||||||||
|
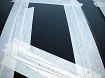
12.
Trace around the edge of the louvers and mark all the holes. You?ll use the hole markings to make sure you leave enough of a lip around the hole to attach the louvers.
|
||||||||||
|
13. After marking both sides, measure again?. Once you?re done with that, measure two more times? Seriously. Look at the louvers from every angle to make sure they are EXACTLY where you want them and they match. |
||||||||||
|
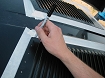
14. Trace a line to the inside of the rivet holes. This is the line you will cut along. |
||||||||||
|
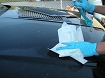
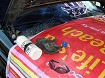
15. Lay some wet towels on your windshield to protect it from sparks.
|
||||||||||
|
16. We also used a big piece of cardboard and another wet towel under the hood to protect things there. Pull out all your favorite safety gear; the fun is about to start. |
||||||||||
|
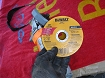
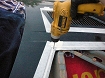
17. Use an angle grinder with a thin, metal cutting disk to make the incision. |
||||||||||
|
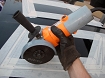
18. Double check to make sure you?re following the correct line, and start cutting. |
||||||||||
|
19. Cut the area between the hood braces first. Be very careful to not cut too much into the braces. Go slowly and you should be able to cut through the top layer only. |
||||||||||
|
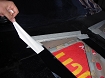
20. The top layer of the hood is basically glued to the braces. Use a screwdriver and carefully pry the two apart. |
||||||||||

|
21. Here you can see the braces below our cut out area. We?ll still be getting plenty of air flow without turning our hood into a giant well cooked piece of pasta.
This is your last chance to make sure the two sides are lined up, so guess what... Measure again! Cut out the other side.
|
||||||||||
|
22. With the holes cut, use the provided drill bit and drill holes for the corners of ONE of the louvers. Okay, so I lied before? THIS is your last chance to make sure the louvers are perfectly aligned. Know what that means? Right, measure again.
Drill the holes for the corners of the other Louver, but don't put in any rivets yet. |
||||||||||
|
23. Remove the tape and wash off the residue. Pop rivets into the corner holes you just drilled. |
||||||||||
|
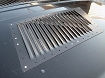
24. The louvers are securely in place now. Take a step back and see how all that measuring paid off. Using the louvers as a guide, drill the rest of the holes and pop in all the rivets.
Congratulations; you?re done.
|
||||||||||
|
Installation IssuesThe only thing we could really call an issue is RunCool?s recommendation of a Harbor Freight rivet gun. Sure we have plenty of crap? I mean stuff from Harbor Freight, but this is one of those occasions where you should probably spend a little extra for something quite a bit better. We followed RunCool?s instructions and got the rivet gun they specified by part number, and it worked great for about 5 rivets. The problem is there are 80 rivets total. Yes 80. That?s an eight followed by a zero. Please do yourself a favor and get a quality tool for the job. |
||||||||||

|
Final ThoughtsThe louvers look great and the do lower under-hood temperatures ? a bit. Maybe it?s just the Utah desert climate, but with an entire summer of testing, we couldn?t replicate their 47° temperature drop. Our average measured with three different thermometers different places under the hood showed an average drop of about 15°. Keep in mind though, that this is air temperature under the hood. The coolant temperature and the operating temperature of the engine were unchanged in our particular application. So what benefits did we actually see? We?ll explain.Opening the hood on a black V8 Grand Cherokee in the hot desert summer requires nothing short of oven mitts. Actually welding gloves are a safer choice. Any time you want to check your oil at the gas station, top off the washer fluid, or just look under the hood like you know what you?re doing; you have to prepare yourself for the immanent 3rd degree burns you?re about to suffer on your fingers. I?m happy to report that with the addition of the RunCool Louvers, this is nothing but a fond memory (that with counceling we?ll be able to keep repressed). Sure the Jeep doesn?t run any cooler, and the actual air temperature isn?t down very much; but being able to open the hood without dawning a nomex suit is a very nice feature. Now back to some of our past Jeep issues you?ll recall from before. We can tell you from personal experience that the extra air flow like these louvers provide makes a world of difference in cooling down Jeep XJs. Even with a quality aftermarket radiator, upgraded electric fans, coolant addative, and a lower temperature thermostat; some XJs just over heat. The problem is no matter how efficient a heat exchanger your radiator is, it has to have air flow to work, and XJ engine bays don?t have any ventilation. If you?re reading along nodding your head because you?ve gone through the same headache on your XJ, order a set of louvers; they work. And the final feature, though we hate to speak it out loud: even if they offer you no cooling benefit, they do look really cool. |
||||||||||
Purchase / Vendor Info
|
| Vendor Name: | RunCool |
| Address: | 6767 Forest Hill Ave. Suite 305 Richmond, VA 23225 |
| Phone: | 804-355-1758 |
| E-Mail Address: | |
| Website: | http://www.raceace.com |
