 |
||
| > Reader's Photo OX5 by Lockheed Martin |
||
 |
||
| • ADVERTISE WITH US | ||
| • WHO IS MOAB JEEPER? | ||
|

Home > Jeep Articles > Technical & Installation - Engine / Drivetrain > Brown Dog 1? Motor Mount Lift |
||||||||||||||||||||||||||||||||||||||||||||||||||||||||||||||||||
 |
||||||||||||||||||||||||||||||||||||||||||||||||||||||||||||||||||
|
Brown Dog 1? Motor Mount LiftArticle written by Dr. JonesDate Added: 08/02/2008 With the addition of a flat belly skid plate, our project TJ was in need of a motor mount lift to put the drivetrain back at the correct angle. |
|
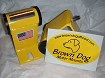
 We picked up a set of 1? MML Classic Polyurethene (for those that don?t know, MML = Motor Mount Lift) mounts from Brown Dog Industries for our 4.0L six cylinder engine. These are a complete replacement, heavy duty motor mount, 1? taller than stock and are a perfect addition to any Jeep with a raised skid plate. We picked up a set of 1? MML Classic Polyurethene (for those that don?t know, MML = Motor Mount Lift) mounts from Brown Dog Industries for our 4.0L six cylinder engine. These are a complete replacement, heavy duty motor mount, 1? taller than stock and are a perfect addition to any Jeep with a raised skid plate.
The installation instructions included with the mounts didn?t get into much detail. In fact we?ll get way more in depth in this article. Brown Dog Industries recommends using a Hayes or equivalent manual for the actual instructions (better yet, just read through this article). Their supplied instructions do make a couple important points which will be mentioned later. |
||||||||||
|
Installation | |||||||||||
|
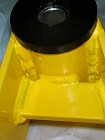
1. Unpack the motor mounts. For all you guys that are geeks about parts, take a few minutes to check out the construction. These are seriously well made pieces that I expect to give years of trouble free service. |
||||||||||
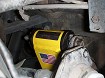
2. Open the hood of the Jeep and disconnect the negative battery terminal.  Seriously, disconnect the battery. The passenger side mount is very near the alternator and hot wires. Seriously, disconnect the battery. The passenger side mount is very near the alternator and hot wires. |
|||||||||||
|
3. If your Jeep has a body lift, peel back the rubber piece on the fender to expose the motor mounts from the sides of the Jeep. This will make working in the tight spaces much easier. |
||||||||||
4. Remove the four nuts on the transmission mount.  This is to protect the transmission mount from tearing while moving the engine up and down. This is to protect the transmission mount from tearing while moving the engine up and down. |
|||||||||||

|
5. Loosen the bolts on the factory motor mounts starting with the nut on the bottom. |
||||||||||
|
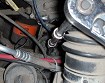
6. Use whatever series of extensions you need to reach the bolt going down from the top of the motor mount. Here is where having that access to the mounts from the side helps line up the socket. |
||||||||||
|
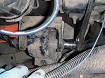
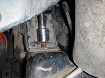
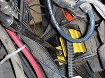
7. Remove the nut from the bolt going through the bushing. This one is a pretty tough reach. The passenger side is accessible from under the hood, but the driver side you?ll need to get from under the Jeep. |
||||||||||
|
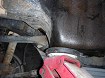
8. Place a floor jack under the oil pan and lift the engine enough to take the weight off the mounts. Either use a rubber pad on the jack or a block of wood. Also put the jack under the corner of the oil pan where it has the most strength, not right in the middle. |
||||||||||
|
9. Once the engine is supported, start with one side?s motor mount. Remove the bolts and nut from the base of the motor mount and the bolt going through the bushing. Remove the factory motor mount. |
||||||||||
|
10. On the other motor mount, remove the nut and bolt holding the mount to the frame. Do not remove the bolt going through the bushing. This will allow you to lift the engine enough to put the MML mount on the other side, but it leaves the factory one there as a safety incase the jack slips. |
||||||||||
|
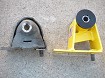
11. Here is the old motor mount next to the new Brown Dog 1? MML. Because our factory mounts were old and sagging, the Brown Dog mounts actually came out to almost 1.5? taller. |
||||||||||
|
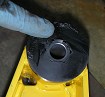
12. Useful tip from the supplied instructions #1: Apply a thin layer of grease to the poly bushing to make it easier to slide into place. This really does help. |
||||||||||
|
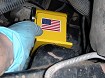
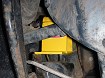
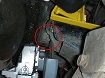
13. Jack the motor up about 2? higher. Slide the new motor mounts into place on the engine. Make sure you have it facing the right way (we didn?t the first time, but we're idiots). An easy way to remember is if you can see the flag, you?re right. The instructions also suggest using a thin putty knife to guide the bushings into place in the motor mount bracket, but this wasn?t necessary in our application. |
||||||||||
|
14. Put the bolt through the bushing and start the nut, but do not tighten. |
||||||||||
|
15. Line up the stud on the bottom of the mount with the hole in the frame and slowly lower the jack. It helps to have two people here, but can be done solo pretty easily. You may need a little help from a pry bar here. |
||||||||||
|
16. Once the stud is through the hole, start the nut on the bottom. |
||||||||||

|
17. Line up the other hole, and start the bolt from the top. Don?t tighten either the nut or the bolt. They are just there to keep the mount in place while you do the other side. |
||||||||||
|
18. Move onto the other side of the engine. Jack up the engine again to take weight off the other mount. Remove the bushing bolt and the factory motor mount.
|
|||||||||||
|
19. Repeat the same steps on this side. Jack the engine up. Start with the bushing bolt. Line up the stud and the other bolt while lowering the engine. And start the nut and bolt.
At this point you should be able to rest the full weight of the engine on the new mounts.
Tighten the bolts and nuts holding the mounts to the frame.
|
||||||||||
|
20. Useful tip from the supplied instructions #2: When tightening the bolts going through the bushings, but DO NOT over-tighten them. You want to get these bolts snug but not super tight, or they will smash the bushing and cause extra vibration. Brown Dog recommends using a steel lock nut. A nylon lock nut will likely melt being so close to the engine. |
||||||||||
|
21. Tighten the four nuts on the transmission mount.
You?re done! Take it for a drive.
|
|||||||||||
|
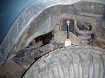
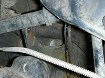
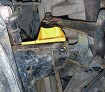
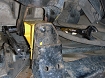
Installation IssuesThe instructions and Brown Dog?s website caution that as the engine gets lifted, the gap between the perch on the frame and motor brackets get smaller and can touch. If these touch, you will not only have an incredibly annoying rattle, but also could cause some damage. You may need to clearance the brackets on the frame and/or motor on the passenger side. This is no fault of the brand, but pretty common place with any motor mount lift. In our case, we probably could have gotten away without doing it, but decided to clearance the mounts just to be sure. Simply take and angle grinder and widen the gap between the frame bracket and the motor bracket.We opted to grind the perch rather than the cast iron motor mounts. If you don?t feel comfortable grinding in that area, Brown Dog sells replacement brackets that offer much more clearance. |
||||||||||
|
Final ThoughtsThis was a very easy, straight forward installation; however, we cannot caution enough about the safety concerns with unbolting the engine from the frame. Do not lie under the engine at any time. That said, these mounts made a noticeable difference in how the Jeep drives. With the Brown Dog mounts, the engine power is transferred more efficiently to the wheels rather than being absorbed by squishing the soft rubber factory mounts. As a result the Jeep is more responsive to acceleration off the line, and the slight shutter we were getting on hard launches is totally gone now. Furthermore, the engine is held very securely in place both side-to-side and front-to-back. With the 4.0, this is a huge plus. You don?t have to be around Jeeps a real long time to see a 4.0 with bad motor mounts punch a hole through the radiator (especially on XJs).If you?re looking for a MML, don?t look anywhere else. The Brown Dog mounts are built like a tank and $50 - $70 LESS than the competition. This was an easy pick for Top Choice. |
||||||||||
Purchase / Vendor Info
|
| Vendor Name: | Brown Dog Industries |
| Address: | 4026 E Wagon Circle Gilbert, AZ 85297 |
| Phone: | 866-401-3877 |
| E-Mail Address: | |
| Website: | http://browndogindustries.com/ |
