 |
||
| > Reader's Photo OX5 by Lockheed Martin |
||
 |
||
| • ADVERTISE WITH US | ||
| • WHO IS MOAB JEEPER? | ||
|

Home > Jeep Articles > Technical & Installation - Suspension > Teraflex 3" JK Lift Installation |
||||||||||||||||||||||||||||||||||||||||||||||||||||||||||||||||||||||||||||||||||||||||||||||||
 |
||||||||||||||||||||||||||||||||||||||||||||||||||||||||||||||||||||||||||||||||||||||||||||||||
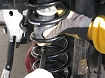
|
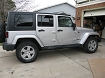
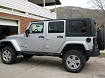
Teraflex 3" JK Lift InstallationArticle written by Carl "Silverback" SchaibleDate Added: 07/13/2008 Teraflex has over 45 years experience in the Jeep industry, so it is no surprise that they make one of the best lifts out there for the new JK Wranglers. |

|
The instructions for this lift are well written and easy to follow. One thing in particular that jumped out at me was on the bottom right hand corner of page one of the instructions ? a revision date. This gives you an opportunity to checkout their website at www.teraflex.biz to make sure you have the latest revision of instructions. As Jeep continues to make tweaks to the JK design, you know Teraflex will be staying ahead of the curve. Follow along as we install this basic 3? JK lift. |
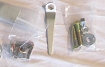
||||||||
|
Installation | |||||||||
|
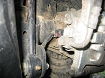
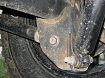
1. The first thing to do before any modification is to take note of how the Jeeps looks before. To get this show on the road, you need to get your JK up on jack stands. Set the jack stands under the frame, and set them pretty high so you have room to drop the axles enough to fit the taller coils. Remove the tires and support the rear axle so you can begin the disassembly of your stock components. |
||||||||
|
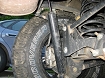
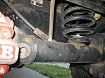
2. Remove the rear shocks. |
||||||||
|
3. Then remove your rear sway bar links. |
||||||||
|
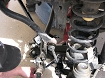
4. Remove the clips that secure the ABS harness to the upper control arm mount. |
||||||||
|
5. Once this is done, you need to unbolt the rear brake line brackets from the frame; but do not disconnect the brake lines from the calipers. |
||||||||
|
6. Unbolt the parking brake bracket.  You will not be able to reconnect this after the lift is installed, so just remove and discard the bracket. You will not be able to reconnect this after the lift is installed, so just remove and discard the bracket. |
||||||||
|
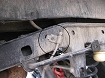
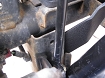
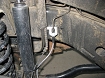
7. Then unbolt the frame end of the rear track bar, but save the bolt and nut because you are going to use them later. |
||||||||
|
8. Once all this is done, lower the rear axle enough that you can remove the stock coils. You may need to loosen the control arm bolts to get enough clearance to remove the coils. DO EVERYTHING YOU CAN TO AVOID REMOVING THE BOLTS! Trust me; I know! But that is for another article! |
||||||||
|
9. Before you install your new coil springs, you need to install the rear coil spring guide into the hole in the frame directly above where springs go. If you are going to carry a lot of weight (such as a full-size spare), you also want to reinstall the factory spring isolator onto the coil spring guide. |
||||||||
|
10. Using some grease and a little whack with the BFH (Big Freaking Hammer) and it pops right in. When you install the new rear coil springs, make sure to install the top end first. It will go much smoother. |
||||||||
|
11. Guys and Gals: save yourself a lot of time, hassle, sweat, and potentially blood; and go rent a coil spring compressor. Imagine if you will, a hairy gorilla like creature (Me), a slightly less hairy spectacled creature (Moab Man), and my buddy Dennis bouncing up and down on a pry bar to squeeze those coil springs in. Enough said. Rent the coil spring compressor; you will thank me for it. |
||||||||
|
12. Make sure to watch the slack on your ABS wiring, brake lines, and axle breather hose; you don?t want to damage any of these while forcing the axle down. Since we did not have the coil spring compressor, we had to remove the breather hose because there just was not enough slack. |
||||||||
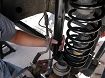
|
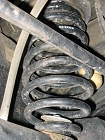
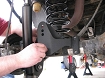
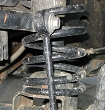
13. Slide the new coil springs into place. |
||||||||

|
14. Once the new rear coil springs are in place, raise the axle to take the slack off all the ABS wiring, brake hoses, axle breather, and install the new shocks at the frame end. |
||||||||
|
15. Now raise the axle enough to install the axle end of the new rear shocks. |
||||||||
|
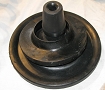
16. Once the shocks are bolted on, it?s time to install your new rear bump stops. When installing the new bump stops, make sure the lip of the bump stops face the front of the Jeep. |
||||||||
|
17. Now, you need to install the coil spring retainers. I can not think of a better way to say it so I am literally taking this straight from Teraflex?s instructions:
To install the rear coil spring retainers on the bottom end of the coil springs first insert the flanged nut into the provided wrench tool and put the nut under the spring pad. Insert the bolt, with the lockwasher on top of the flat plate, into the rear lower spring retainer, holding the flanged nut in place using the provided wrench tool and begin tightening the bolt. Remove the tool when finished. |
||||||||
|
18. Install the new rear sway bar links on the INSIDE of the sway bar brackets. I made that mistake and did not notice it until I was totally finished and was inspecting my work with the instructions.  Watch the clearances when installing your new links. They are in very tight quarters and may need to be adjusted to prevent rubbing on the frame or tire. Watch the clearances when installing your new links. They are in very tight quarters and may need to be adjusted to prevent rubbing on the frame or tire. |
||||||||
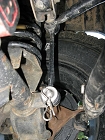
|
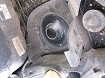
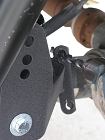
19. Time to install the new rear track bar bracket on the axle. |
||||||||
|
20. This is one beefy piece of hardware to say the least. When we installed it (or attempted to install it I should say) not even the BFH (see previous description of BFH) and a lot of elbow grease could make the axle U-bolt line up properly to get the bracket fastened. |
||||||||
|
21. We actually had to drill out about 1/16th of an inch of material to get the U-bolt in place. We immediately informed Teraflex of the problem, and they said it would be remedied. |
||||||||

|
22. Now reconnect the rear track bar to your new bracket. |
||||||||
|
23. Relocate the brake lines with the new brake line extension brackets, and the rear is now complete! Be sure to tighten the control arm bolts you loosened earlier. |
||||||||

|
24. At this stage, we decided it was time for a much needed lunch break. Before you say anything, yes it is true that the camera adds ten pounds. |
||||||||
|
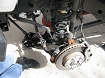
25. Moving forward to the front, you need to remove the front skid plate (go ahead and throw this worthless plastic piece away after removing it). Just like in the rear, support the front axle and remove the front shocks. |
||||||||
|
26. Loosen the front track bar and control arm bolts. |
||||||||
|
27. Disconnect the stock sway bar links. |
||||||||
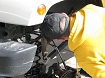
|
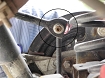
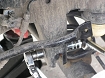
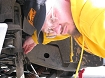
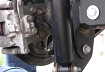
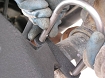
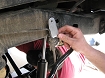
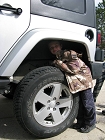
28. Remove the clips holding the ABS wires in place, and install the new extended brake lines. Make sure to use the brackets provided with the kit. If not, there will be too much slack in the lines, and they might get snagged or damaged and need to be replaced down the road. Additionally, as recommended by Teraflex, loosely zip tie the brake lines and abs lines to the shock as shown in the photo. |
||||||||
|
29. Remove the stock coil springs. |
||||||||
|
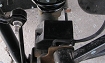
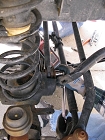
30. Remove the upper bump stops from the coil tower. Remove the spring isolators, and then install the new spring spacers. We found again that a little grease and the BFH go a long way with installing the bump stop extensions. Install the factory bump stops into the new bump stop extensions. |
||||||||
|
31. Because we did not rent a spring compressor. We ended up doing this the wrong way by actually popping the bump stop in with a pry bar. But it still worked. |
||||||||
|
32. Remember the whole bouncing on the pry bar forcing the coil spring into place thing from earlier? Insert that statement again here. Please be smarter than us and go rent a coil spring compressor. Install your new front coil springs top end first. |
||||||||
|
33. Install your new front shocks. |
||||||||
|
34. Now the quick disconnect links can be installed. |
||||||||
|
35. Now bleed your brake lines in the front, and put your tires back on. With the tires back on and the JK back on the ground, go around and check all your ABS wires, brake lines, and axle breather tubes. You also at this point need to go around and re-torque all control arm, track bar, and sway bar link bolts. I would recommend duplicating this process at least every week for the next few weeks. I waited too long and actually lost a lower control arm bolt because of it. |
||||||||
|
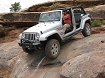
36. You can comfortably fit 35s underneath your JK with your new lift installed. You can see there is plenty of room to stuff some nice new rubber in those wheel wells. Even enough to stuff a small child!!! No children or animals, especially gorillas, were harmed during the installation of this lift. |
||||||||
Installation IssuesAs mentioned previously, when installing the new rear track bar bracket we had to drill out about 1/16? of an inch of material on the bracket itself and then use the BFH to massage the U-Bolt into place so we could secure it. This was the only real ?issue?, but we do have a couple suggestions for Teraflex to make the install go a little smoother.
Things we would like to see updated in the Installation Instuctions ? Step 10 of the instructions says to watch the breather hose, brake lines, and ABS wiring. We had to actually remove the breather hose because their just was not enough slack to remove the coils without doing so. We suggest the instructions say to remove the breather hose to save time fighting with it. ? Step 15 of the instructions is on installing the rear shocks. The shock relocation bracket (At least at the time I received my lift) was still included with the kit but is not a necessary piece when using the new rear track bar bracket and U-bolt. A lot of people have found this extra piece confusing and didn?t know 1: what this little bracket was for and 2: that it is not needed with the new track bar bracket. We suggest Teraflex either clearly explain the piece in the instructions or not include it with the kit. ? Step 29 of the instructions referring to installing the new front brake lines does not mention anywhere using the included brackets. Nor is there a picture that really references them. I actually, thinking they were leftover unused parts like the rear shock bracket, threw them away. The instructions should definitely include information and a picture of this piece. ? One thing throughout these instructions is a lot of missing torque specifications. This sadly pretty common place in instructions by every manufacturer. A lot of guys with limited mechanical knowledge or experience will try installing these lifts and it would be a very nice addition to have all the torque specifications to use during installation. |
|||||||||
|
Final ThoughtsHaving had my JK back on the road for a while now with the new lift, the on-road manners are as good as if not better than stock. Teraflex really put some time and effort into designing this lift, and I don?t think you will find a better one for the money. Additionally, and even more important to me, their customer service is TOP NOTCH. I made a few mistakes with the installation of my lift, and admitted to doing so fully expecting to have to pay for my mistakes (which I was willing to do). However, each and every time, Teraflex bent over backwards to help me in any way they could. That kind of service almost never comes around anymore, and when it does, you normally have to pay extra for it. With Teraflex though, it is just how they do things.Stay tuned. Next time around we will be installing the full Flexarm upgrade that Teraflex offers for this 3? lift and testing it on the trails in Moab; see you then!!!
Installation Article Teraflex 3" JK Lift Review |
||||||||
Vendor ResponseVinnie at Teraflex has assured us that all the installation issues we encountered will be remedied as soon as possible, probably even by the time you're reading this. |
|||||||||
Purchase / Vendor Info
|
| Vendor Name: | Teraflex |
| Address: | 5251 South Commerce Dr Murray, UT 84107 |
| Phone: | 801-288-2585 |
| Website: | http://www.teraflex.biz/ |
