 |
||
| > Reader's Photo OX5 by Lockheed Martin |
||
 |
||
| • ADVERTISE WITH US | ||
| • WHO IS MOAB JEEPER? | ||
|

Home > Jeep Articles > Technical & Installation - Body Interior / Exterior > Gen Right YJ Crawler Tank |
||||||||||||||||||||||||||||||||||||||||||||||||||||||||
 |
||||||||||||||||||||||||||||||||||||||||||||||||||||||||
|
Gen Right YJ Crawler TankArticle written by Adventure BobDate Added: 06/29/2007 Is your stock tank starting to hold a little less gas? Is the condition of the plastic liner beginning to worry you? GenRight Offroad has the solution! |
|
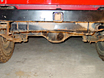
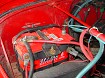
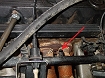
 The stock gas tank skid and liner combo on our project YJ (aka Turtle) were about at the end of their useful life, so we went in search of a better solution. GenRight Offroad offers aluminum tank, steel skid combos for most Jeep models. Their tanks vary from straight bolt-on, to those that allow you to extend your wheelbase four inches by increasing axle clearance. The stock gas tank skid and liner combo on our project YJ (aka Turtle) were about at the end of their useful life, so we went in search of a better solution. GenRight Offroad offers aluminum tank, steel skid combos for most Jeep models. Their tanks vary from straight bolt-on, to those that allow you to extend your wheelbase four inches by increasing axle clearance.
For this installation we had the rare opportunity to install two types of gas tanks on the same vehicle. You may see the pictures intermixed, but they both went in exactly the same way. Upon opening the boxes we were impressed with the build quality and the welds. We were also impressed with the completeness of the kit and the instructions. We test a lot of products and can honestly say GenRight is one of the few truly bolt-on products we've tested this year. Both tanks went in, as the instructions said they would, with no fuss, no guessing, and no calls to GenRight for help. We know some readers will balk at the cost (around $800 retail) but look at the alternatives. If you?re going to replace your skid and tank with stock components from online sources, you?re at about $400. To upgrade to an aftermarket skid and a new stock tank you?re looking at about $650. To get to an aluminum tank and aftermarket skid, you?re in the same cost ballpark as GenRight, and you?re probably looking at a lot more work. Additionally, the increased capacity, 20 gallons, is a welcome plus for a YJ. The only other way we found to get to this level of quality was with a fuel cell, which comes with its own set of complications and fabrication requirements. We think the purely bolt-on nature, the quality, and bash resistance are well worth the cost. |
||||||||||||
|
Installation | |||||||||||||
|
1. Pull the negative battery lead. |
||||||||||||
|
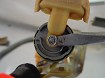
2. Bleed the fuel system pressure at the fuel rail. Fuel is under a lot of pressure; wrap a rag around the vent before depressing. Fuel is under a lot of pressure; wrap a rag around the vent before depressing.
|
||||||||||||
|
3. Disconnect the fuel pump electrical connector, filler, and vent lines from the tank. |
||||||||||||

|
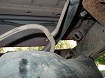
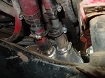
4. Remove the six bolts holding the tank to the body, and lower slightly. Place a floor jack under the tank before you start. Drench the nuts in PB Blaster before starting. Drench the nuts in PB Blaster before starting.
|
||||||||||||
|
5. Disconect the feed, return, and vent lines. |
||||||||||||
|
6. Lower and remove the tank. |
||||||||||||
|
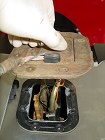
7. Remove the pump assembly from the stock tank by removing the eight bolts and carefully pulling it out through the opening. |
||||||||||||
|
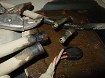
8. Change the fuel strainer by loosening the holding bracket and removing the locking clip. Replace with a strainer and locking clip. Changing the fuel strainer isn?t part of the tank install, but ours needed to be done. These locking clips do not come with the new fuel strainer. We got ours at Ace Hardware. |
||||||||||||
|
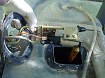
9. Install the pump assembly into the new tank. Do not damage the gasket! Make sure you can read the word ?front? and it's facing forward. In the YJ Enduro, the pump sits sideways compared to stock. |
||||||||||||
|
10. Raise tank enough to allow connection of the fuel feed, return, and vent lines. |
||||||||||||
|
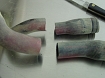
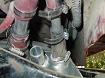
11. Cut the fuel filler and vent hoses, and install the metal extensions. |
||||||||||||
|
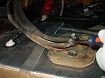
12. Atttach the filler assembly loosely to the tank and the filler inlet. Tightening the hose clamps before installation will cause problems getting proper alignment. |
||||||||||||

|
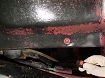
13. Raise the tank all the way, and install the six nuts. Watch the filler and feed lines as you raise the tank to prevent damage.
|
||||||||||||
|
14. Adjust the filler and breather hoses as necessary, then tighten the hose clamps. |
||||||||||||
|
15. Connect the fuel pump connector and battery. Fill the tank with gas checking for leaks at the hose connections. |
||||||||||||
|
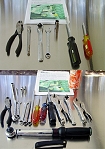
Installation IssuesThis is one the few products we can actaully say we no issues with. While it's a great product, we cant let Tony off that easy. We did need a couple more tools than what the instructions specify ? as you can see in the photos, but only a couple. |
||||||||||||
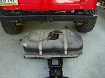
Final ThoughtsThis is a great product! We abused it hard in Moab for its initial testing. This tank/skid combo raised the height at the center of the tank to 16.5 inches on 33 inch tires. That?s higher than Moab Man?s aftermarket skid on 35s. During 3 months of hard wheeling, we've managed to scratch the finish slightly but nothing deeper than cosmetic damage easily corrected with a can of Krylon.For ease of installation and function, we'd definitely buy this product again! |
|||||||||||||
Purchase / Vendor Info
|
| Vendor Name: | Gen-Right Offroad |
| Address: | 1816 Angus, Unit A Semi VAlley , CA 93063 |
| Phone: | 805-584-8635 |
| Contact Person: | Tony Pellegrino |
| E-Mail Address: | |
| Website: | http://www.genright.com |
