 |
||
| > Reader's Photo OX5 by Lockheed Martin |
||
 |
||
| • ADVERTISE WITH US | ||
| • WHO IS MOAB JEEPER? | ||
|

Home > Jeep Articles > Technical & Installation - Body Interior / Exterior > Mile Marker SX9.5 Winch |
||||||||||||||||||||||||||||||||||||||||||||||||||||||||||||||||||
 |
||||||||||||||||||||||||||||||||||||||||||||||||||||||||||||||||||
|
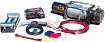
Mile Marker SX9.5 WinchArticle written by Dirty GirlDate Added: 03/24/2007 Mile Marker stepped up to the challenge with a winch that has stamina AND smarts. |

|
Mile Marker has raised the standard in winch technology. Its MOSFET controller is complete with LED feedback lights, illuminated controls, and state-of-the art safety features. If you want all the bells and whistles in a winch that still meets your needs in gear and motor design, take a look at Mile Marker. |
||||||||
|
Installation | |||||||||
|
1. Unpack all hardware, control box, winch, and roller fairlead.
|
||||||||

|
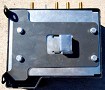
2. Start the installation by setting up the control box. |
||||||||
|
3. The mounting bracket is fastened to the control box.
 The instructions cover installing the bracket to the control box. Ours came with the bracket already installed. The instructions cover installing the bracket to the control box. Ours came with the bracket already installed. |
||||||||
|
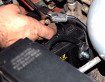
4. Mount the control box to the motor on the Tie Bars. |
||||||||

|
5. Loosen Tie Bar bolt with an Allen wrench. |
||||||||
|
6. Align the control box with the mounting point and tighten the bolt to the Tie Bar. |
||||||||
|
7. Here is the secured control box using the Tie Bars as a mounting point. |
||||||||

|
8. Secure the bracket to the motor using the provided tie-wrap (zip tie). We added a spacer between the control box and motor to eliminate the gap caused by the mounting bracket assembly issue. |
||||||||
|
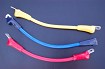
9. Slip the boots onto the cable ends. |
||||||||
|
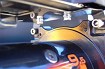
10. Connect the black ground cable to the stud on the motor. |
||||||||
|
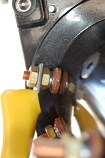
11. Attach yellow, red, and blue cables to the motor (according to color coded studs) with the supplied washers and nuts. |
||||||||
|
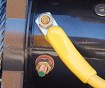
12. Attach the cables to the control box using a nut, spring washer, and flat brass washer. |
||||||||
|
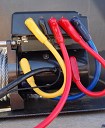
13. Complete the wiring according to the schematics. |
||||||||

|
14. Slide the wire boots over the electrical connections. |
||||||||

|
15. Mount the winch and roller fairlead to the winch plate using the hardware provided. |
||||||||
|
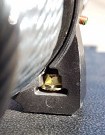
16. Place the nuts and washers in the winch feet, and bolt them to the winch plate. |
||||||||

|
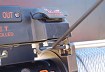
17. Mount winch and winch plate on the vehicle per winch plate manufacturer?s instructions. |
||||||||
|
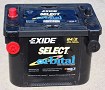
18. Run red power cable and black ground cable to the battery. The battery we used allowed easy connection of cables to the side post with battery cable bolts. Some batteries require using the top posts with a winch. Check your battery specs before wiring. |
||||||||
|
19. The small black wire (fused wire) must be attached to the battery ground terminal. |
||||||||

|
20. Complete assembly by connecting the hook to the winch cable. |
||||||||
|
21. Plug in winch control, and turn it on by pushing on/off button located on the control box. Plug in the controller, and try it out! |
||||||||
|
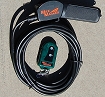
22. In addition to the wired controller, every SX series winch comes standard with a key-fob style wireless controller. This works automatically with the MOSFET control box and doesn't require any additional installation. |
||||||||
|
Installation IssuesThe manufacture?s install instructions for the control box describe mounting a different type of bracket to the motor. We believe the bracket that came with our control box is used for mounting the MX/PE/E series control box bracket (not the SX series). This caused a ¾? gap between the bracket and the motor. To correct this issue, we used a spacer to eliminate the gap and mounted the control box bracket to the Tie Bars instead of the mounting points cast into the motor. |
||||||||

|
Final ThoughtsThe instructions were simple and easy to follow with clear visual references. Except for the problem with the mounting bracket for the control box, the installation was smooth. Mile Marker?s SX9.5 has an exciting, high-tech, on-board computer. Our favorite feature is definitely the various warnings given to the operator through flashing LED lights. The brains of the winch controller will protect the winch and the Jeep in the following ways: If the battery voltage gets too low, the winch will shut down until the system is charged enough to resume winching. If the winch gets too hot, it will shut down till it cools. And if the line is being spooled out under power for more than ten seconds, the winch will shut down and rest for five seconds to protect the brake mechanism. The latter two can be manually overridden in an emergency.The new ?smart? winch with the MOSFET controller hasn?t lost any of the muscle Mile Marker is famous for. |
||||||||
Purchase / Vendor Info
|
| Vendor Name: | Mile Marker |
| Address: | 2121 Blount Road Pompano Beach, FL 33069 |
| Phone: | 1-800-886-8647 |
| Website: | http://www.milemarker.com |
 Our
Thank You's!
Our
Thank You's!
MOABJEEPER Magazine would like to thank Mile Marker for participating in our "Winches In Hell" shootout.
