 |
||
| > Reader's Photo OX5 by Lockheed Martin |
||
 |
||
| • ADVERTISE WITH US | ||
| • WHO IS MOAB JEEPER? | ||
|

Home > Jeep Articles > Technical & Installation - Suspension > Rubicon Express Stainless Steel Brake Lines |
||||||||||||||||||||||||||||||||||||||||||||||||||||||
 |
||||||||||||||||||||||||||||||||||||||||||||||||||||||
|
Rubicon Express Stainless Steel Brake LinesArticle written by Dirty GirlDate Added: 03/15/2007 Sometimes it?s not just the obvious up-grades that need your attention. As you build up your rig; don?t forget the small, yet important, modifications. |

|
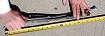
Recently I installed a 3.5? Super Flex Rubicon Express Lift Kit on my 01 TJ. Included in the kit were Rubicon?s 20? front brake lines made of a strong woven-stainless-steel outer shell. This protects the rubber and Kevlar casing that houses the Teflon inner hose. When increasing the height of your rig, take the time to lengthen your brake lines; so they are sufficient for full suspension travel. Components of the brake line kit: 2 ? 20? brake lines 2 - E-Clips 2 ? Brake line brackets Bolts A few tools you will need for this project: Flare Nut Wrench Torx-drive Socket Tap & Die Set Drill |
||||||||
|
Installation | |||||||||

|
1. Jack up your front end and place jack stands under the vehicle. Make sure that it is stable and safe. |
||||||||
|
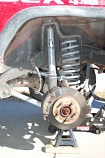
2. Remove the tires to allow easy access to brackets, brake lines, and calipers. |
||||||||
|
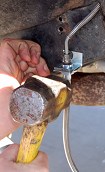
3. Loosen the nut that attaches the integral bracket to the frame behind the hose fitting. |
||||||||
|
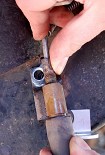
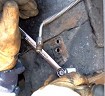
4. With a flare nut wrench, loosen the brake line fitting between the hard line and the rubber hose. A flare nut wrench will protect the corners of the fitting from becoming rounded off. Be careful not to bend the frame bracket or brake line. |
||||||||
|
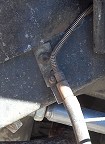
5. Disconnect the brake line from the hose. |
||||||||
|
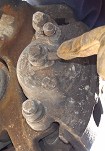
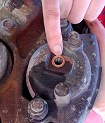
6. Remove the inlet fitting bolt (banjo bolt) from brake caliper and separate the hose. Between the caliper and the fitting are sealing washers that will be used during installing of the new brake lines. Be careful with these. |
||||||||

|
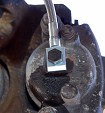
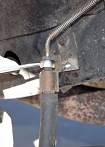
7. Using a Torx drive socket, remove the bolt to detach the integral hose bracket. |
||||||||
|
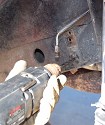
8. To get full wheel drop, you will need to relocate the bracket lower on the frame. |
||||||||
|
9. Drill and tap the new hole for the bracket. Keep the bit and tap well lubricated. Keep the bit and tap well lubricated. |
||||||||
|
10. Bolt on the new bracket. |
||||||||
|
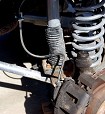
11. To install the new brake hose, start by attaching it to the caliper. Make sure the seal washers are clean, and put them back in place. |
||||||||
|
12. Tighten the banjo bolt. |
||||||||
|
13. Connect the new brake hose to the brake line through the mounted bracket. |
||||||||

|
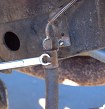
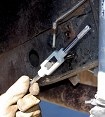
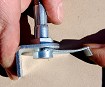
14. Screw the brake line threaded fitting into the new hose fitting with the flare nut wrench. Do not tighten it yet. |
||||||||
|
15. Insert the E-clip, and tap it into place. |
||||||||
|
16. Tighten the brake line fitting securely. Do not over-tighten, just make it good and snug. |
||||||||
|
17. Make sure that the hose doesn?t contact the tire, wheel, or any moving suspension system parts. Turn the wheels back and forth, and cycle the suspension to make sure there is no contact. If there is, use zip ties and/or retainer springs to hold the hose out of the way; but be sure it doesn?t bind. Bleeding the brakes is necessary when installing new hoses or lines. Bleeding the brakes is necessary when installing new hoses or lines. |
||||||||
|
Installation IssuesWhen installing 3.5? Rubicon Lift, you gain height and articulation. Our concern is the kit only came with 20? brake lines (2? longer then stock) and may not be adequate for the increased wheel travel. At a later date we will inform you if the length is an issue or not. We believe relocating the bracket lower on the frame will help this problem. |
||||||||

|
Final ThoughtsRubicon Express supplies a well built brake line with their kit. In all, the installation was easy and straight forward. The drilling and tapping required for relocating the bracket is our addition, and is not in the supplied instructions. The time spent to modify my brake lines was well worth it. Not only are the Rubicon brake lines sharp looking and durable, they are much safer on our lifted Jeep. |
||||||||
Purchase / Vendor Info
|
| Vendor Name: | Rubicon Express |
| Address: | 3290 Monier Circle #100 Rancho Cordova, CA 95742 |
| Phone: | 877-FOR-RUBICON |
| Website: | http://www.rubiconexpress.com/ |
