 |
||
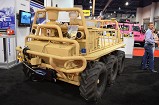
| > Reader's Photo OX5 by Lockheed Martin |
||
 |
||
| • ADVERTISE WITH US | ||
| • WHO IS MOAB JEEPER? | ||
|

Home > Jeep Articles > Technical & Installation - Body Interior / Exterior > RNventions Soft Top Reinforcing Kit |
||||||||||||||||||||||||||||||||||||||||||||||
 |
||||||||||||||||||||||||||||||||||||||||||||||
|
RNventions Soft Top Reinforcing KitArticle written by TheMajor of Links4Jeeps.comDate Added: 06/13/2006 If you have a soft top or bikini top for your Jeep Wrangler YJ, you've probably noticed that the Phillips self-tapping screws used to hold the soft top windshield channel in place readily strip out. |

|
Our friends at RNventions had a solution to our problem. They carry a retaining kit that effectively secures the channel in place by replacing the self-tapping screws with threaded rivet inserts and stainless steel screws. This kit includes everything you need to complete this easy and effective job, right down to the spare hardware. This well-engineered, easy-to-install kit is a one time installation. The instructions are precise and have drawings of each step in the installation process. Tools Drill Flat head screwdriver Phillips screw driver Scissors Safety goggles |
|
Installation | |
|
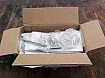
1. Each piece is wrapped for protection.
|
|
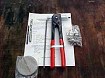
2. This kit is complete. It comes with almost everything you could possibly need: threaded rivet inserts, spare rivets, rivet gun, ¼-inch flat head screws, spare screws, ½-inch drill bit, 3/8-inch drill bit, weather stripping, round file. How many items come with a rivet gun? |
|
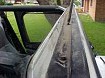
3. Remove soft top from Jeep. |
|
4. Remove old Phillips head screws from retaining rail. |
|
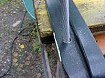
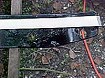
5. Remove retaining rail. Retaining rail is aluminum, be careful not to bend it when removing! Now clean that surface with a damp cloth before proceeding to the next step. Retaining rail is aluminum, be careful not to bend it when removing! Now clean that surface with a damp cloth before proceeding to the next step. |
|
6. Using the supplied 3/8-inch bit, drill out the existing holes that the old Phillips screws were in. Be sure to wear your safety goggles.
|
|
7. Test fit the supplied rivets into the drilled holes. |
|
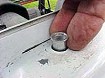
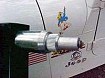
8. Screw a rivet onto the supplied rivet tool and test fit a supplied 1/4-inch stainless screw into rivet. |
|
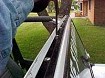
9. Insert rivet into hole until seated at the rivet flange. Squeeze the tool handle until the rivet is firmly set and does not move. If you have doubts on how to use a rivet gun, RNventions has a nice how-to. |
|
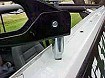
10. Test fit a supplied 1/4-inch stainless screw into rivet. |

|
11. Using the supplied ¼-inch drill bit, drill out the holes in the retaining rail. This is easily done because the rail is aluminum. |
|
12. Then using the supplied round file, enlarge the holes so the ¼-inch screw head misses the lip molded into the retaining rail. This is very easy to do due to the aluminum. Test fit the retaining rail over the installed rivets to make sure the holes line up. If they don't just file where needed. |
|
13. Install the supplied weather stripping to the bottom of the retaining rail. The adhesive side will stick to the rail. Be sure it clears the holes in the rail. Using scissors, cut the weather stripping to the same length as the rail. |
|
14. Completed retaining rail.
|
|
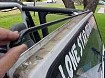
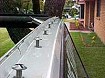
15. Install the retaining rail and ¼-inch screws. Using a flat head screwdriver tighten all screws. |
|
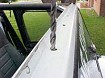
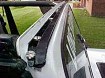
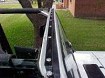
16. All the screws are in. |

|
17. Another view. |
|
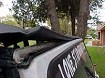
18. Install top and you are finished.
|
Final ThoughtsThis project really impressed me with the ease of installation and professional look. Thanks to RNventions for carrying such a useful and complete product. You Jeepers will not be disappointed with the outcome. |
|
|
