 |
||
| > Reader's Photo OX5 by Lockheed Martin |
||
 |
||
| • ADVERTISE WITH US | ||
| • WHO IS MOAB JEEPER? | ||
|

Home > Jeep Articles > Technical & Installation - Body Interior / Exterior > Poison Spyder Trail Cage |
||||||||||||||||||||||||||||||||||||||||||||||||||
 |
||||||||||||||||||||||||||||||||||||||||||||||||||
|
Poison Spyder Trail CageArticle written by GreenYJDate Added: 10/01/2006 Beefing up axles and bringing spare parts are life savers for your Jeep when you get a little throttle happy. But what?s going to save you! |
|
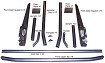
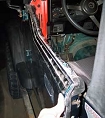
 The Poison Spyder Trail Cage we chose to install in a YJ is a weld-in addition to the stock Jeep sport cage. We looked at many other cages on the market. Poison Spyder's cage comes standard with many features that are only available as an additional cost upgrade from other companies. For example, while many other cages bolt to the cowl only, the Poison Spyder cage bolts to the cowl and to the floor for more strength. The Poison Spyder Trail Cage we chose to install in a YJ is a weld-in addition to the stock Jeep sport cage. We looked at many other cages on the market. Poison Spyder's cage comes standard with many features that are only available as an additional cost upgrade from other companies. For example, while many other cages bolt to the cowl only, the Poison Spyder cage bolts to the cowl and to the floor for more strength. Although not as complete as their Full Roll Cage, it still provides plenty of protection for the budget do-it-yourself wheeler! While waiting for the parts to arrive, there is plenty of prep work to do on your stock cage. We chose to remove ours, prep it for paint, and bolt it back in for the install. This installation requires an extra set of hands to make sure everything is lined up correctly. |
||||||||
|
Installation | |||||||||
|
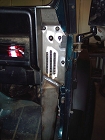
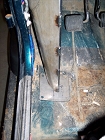
1. Place Universal Floor Plate (#7) in the bottom of the Jeep with the plate angled up to the outside. |
||||||||
2. Remove the windshield bolts (3 on each side) that secure the windshield to the dash. Remove the cowl bolts, and bolt the Front Dash Supports (#4) to the cowl loosely. You may need to use a hammer to align the Front Dash Support. You may need to use a hammer to align the Front Dash Support. |
|||||||||
|
3. Push the Front Dash Supports as far inboard as they go and tighten the bolts. It?s crucial to get the supports as far inboard as possible or you may have problems with your doors closing. Once the bolts are tight, test fit your doors. If they hit, contact Poison Spyder Customs. It?s crucial to get the supports as far inboard as possible or you may have problems with your doors closing. Once the bolts are tight, test fit your doors. If they hit, contact Poison Spyder Customs. |
||||||||
|
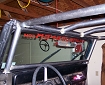
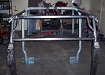
4. Test fit the Dash Bar (#18) and Upright Bars (#17). When satisfied with the placement, tack weld them into place. Position the Dash Bar about ¼ of an inch above and level with the dash to allow for body movement. |
||||||||
|
5. Test fit and tack weld the Front Upper Bar (#9) in place ensuring bends are towards the windshield. If you have the Upper Bar in backwards, the Spreader Bars will not fit. |
||||||||

|
6. Test fit and tack weld the Spreader Bars (#13). check for head clearance while sitting in your seats before final welding. Minor grinding to the rear of the Spreader Bars was necessary to ensure a good fit. |
||||||||
|
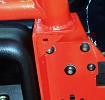
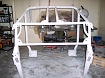
7. Install and tack weld the Triangles (#5) to the side supports in the corner under the Upright Bars. The triangles add critical structural support and should not be left out. |
||||||||
|
8. Tack the Floor Plate to the Side Support. |
|||||||||
|
9. Mark the Floor Plate holes, 4 each side, for drilling. |
||||||||
|
10. Remove the entire cage. Use two people for lifting and installing the cage. The cage is very heavy when assembled, and you don't want to damage your paint/Jeep. Use two people for lifting and installing the cage. The cage is very heavy when assembled, and you don't want to damage your paint/Jeep. |
||||||||
|
11. Drill the holes in the Jeep?s floor board. |
|||||||||
|
12. Final weld all of the joints on the trail cage. If you bought handles and/or gussets, weld those in at this time. |
|||||||||
|
13. Paint or powder coat your cage. |
||||||||
|
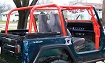
14. Install the cage and bolt everything in. Start all the bolts that hold the cage in the vehicle before tightening any completely. Use two people for lifting and installing the cage. |
||||||||
|
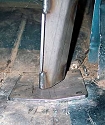
Installation IssuesThe Spreader Bars appeared to have been notched to fit 1.75? tube and not the larger stock roll bar.The stock windshield visors will not fit with the cage installed. Also, the E-brake may hit the side support causing it to stick. The directions Poison Spyder provided were a little confusing in steps #4 and #8. Both steps talk about the same triangle pieces. Step #8 appears to just be a repeat of step #4. We had a problem with the fit of the Front Dash Support leg and the door. The doors hit almost one inch into the supports. The holes in the side supports are an exact fit not allowing for any side to side adjustment. We spoke with Paul at PSC about the problem. PSC has run into this once or twice. His suggestion for our situation was to cut out the part of the door that?s hitting the Front Dash Supports and replate the hole so it clears. |
||||||||
|
Final ThoughtsThis is a great cage for those on a budget. For the cost, this cage offers more standard features than other cages we have installed. For a little extra, you can also order handles and gussets to customize your cage.The installation was fairly easy but does require welding; therefore, we recommend an experienced welder. Since every Jeep is slightly different, each will be unique in the amount of effort required to properly make this cage fit. The cage looks wonderful! We are very happy with the installation and Poison Spyder?s customer support. |
||||||||
Purchase / Vendor Info
|
| Vendor Name: | Poison Spyder Customs |
| Address: | 2140 W. Dartmouth Englewood, CO 80110 |
| Phone: | 303-777-4820 |
| Website: | http://www.poisonspyder.com |
 Our
Thank You's!
Our
Thank You's!
Thank you PSC for answering all of our questions.
