 |
||
| > Reader's Photo OX5 by Lockheed Martin |
||
 |
||
| • ADVERTISE WITH US | ||
| • WHO IS MOAB JEEPER? | ||
|

Home > Jeep Articles > Technical & Installation - Body Interior / Exterior > Military Lights For Your Jeep |
||||||||||||||||||||||||||||||||||||||||||||||||||||||||||
 |
||||||||||||||||||||||||||||||||||||||||||||||||||||||||||
|
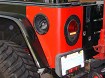
Military Lights For Your JeepArticle written by Tom DubeDate Added: 05/11/2006 Stock tail lights just seem to take a beating out on the trail. Many Jeepers have been replacing them with the round LED flush mount lights, and I was headed the same way until someone showed me a picture of a TJ with Military lights. |
With my 5 yrs. on the M-1 Tank in the Army, military lights are very familiar to me; but I had never seen them mounted in a TJ before. The LED style lights look great, but I sure did like the look of the Military lights flush mounted on that TJ. This install of the Military lights with buckets will fit 2002 and below. If you want to put them on a 2003 or newer TJ, you will need to relocate the gas evaporator located in the rear corner of the passenger side. Be sure you check if your Jeep has one before you start drilling and cutting. |
|||||||
|
Installation | |||||||
|
1. Once you have the lights and buckets, you will need to do some prep work before installing. |
|||||||
|
2. The lights will come with 24 volt bulbs. These have to be changed out to 12 volt bulbs. |
|||||||
|
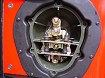
3. When you take the light housing cover off, you will see that two bulbs are located in the upper section. These will be for your parking lights and stop/turn signal. In the next section down, you will remove this bulb and leave it empty. The lower section will be for the reverse light. Bulbs to purchase, top bulb is #67 next down is #1156 and the bottom one is #67 available at any parts store Bulbs to purchase, top bulb is #67 next down is #1156 and the bottom one is #67 available at any parts store |
||||||
|
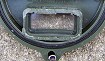
4. Now look at the back of the lens. You will see that the lowest window has a cover over the clear lens in the back. This cover is melted into place and will have to be removed. I used a very small screw driver to dislodge it.
caution: Be very careful not to cut your self.
|
||||||
|
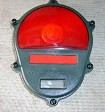
5. Next you will need to place a piece of reflective tape on the front of the center lens. DOT requires red reflectors on tail lights. |
||||||
|
6. Remove the stock lights with wiring harness. To unplug harness, look between the back bumper and gas tank. |
|||||||
|
7. Once you have the light and harness out, cut the wires as close to the light housing as you can. This will leave you with about 10? of wire with the harness plug attached. You will be connecting this to the military lights. |
|||||||

|
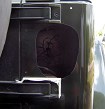
8. Now the fun part, cutting steel: Tape the passenger side template in place over the three holes that the stock light was mounted to. |
||||||
|
9. Trace the outside edge and start cutting. When you get to the hinge area, follow edge of hinge and pick up the traced line again.  Be careful not to cut into hinge. Be careful not to cut into hinge. |
||||||
|
10. Time to cut driver?s side. Tape the driver?s side template over the three holes and trace. This one is easier with nothing to cut around. When your done with both sides, de-burr the edges of the holes. |
||||||
|
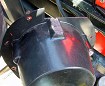
11. Installing the buckets: Start with the drivers side first. This is the easy one. Fit bucket into hole and see where inside edges of bucket need trimming. This is a slow process. I used a die grinder with an abrasive disk, but it can also be done with a file. |
|||||||
|
12. Once you have the bucket set in place, drill mounting holes, but do not bolt it in. Remove bucket for later assembly. |
|||||||
|
13. On to passenger side, here is where the fitting gets interesting. Fit the bucket into hole; you will have to cut the outside flange to fit around the hinges. Take your time, this is one of he hardest parts of the fit. |
||||||
|
14. When it?s done, drill holes and remove bucket for later assembly. |
|||||||
|
15. Wiring the lights: Four wires come out of the back of the military light housing. These wires have metal tags with numbers on them. Connect three of the four wires to the harness you cut off the stock lights as follows: White to # 21 will be for parking light Green / Black to # 22 will be for Stop/turn signal White / Black to # 23 will be for reverse # 24 not used |
|||||||
|
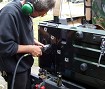
16. To connect the wiring harness to military light wires, I used male and female blade style connectors and rubber waterproof boots to protect the connections. |
|||||||
|
17. The two bolts that hold the light into the bucket are also the grounding points. As you can see I have attached a wire between both bolts. One bolt is the ground for the upper lights and the other is for the lower light. Attach a wire between the bolts and another wire to one of the bolts to use as the main grounding wire to the Jeep body |
||||||
|
18. When you?re ready to mount the light and bucket into the driver?s side, remove the gas tank filler bezel. This way you can reach into the body panel when bolting in bucket/light assembly mounting bolts.
|
|||||||
|
19. Insert the wires and bucket assembly into the driver?s side. The grounding wire will be attached to one of the bucket flange mounting bolts. |
|||||||
|
20. Once all bolts are tight, connect the wiring harness. Replace the gas tank bezel and this side is done. |
||||||
|
21. On the passengers side you will have to reach in from below the corner to place washers and nuts onto bolts. Insert bucket/light assembly into the passenger side hole and insert bolts. Attach grounding wire and connect wiring harness and you are done. |
||||||
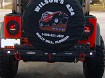
Final ThoughtsSo from my prospective what do I think of these lights? The look is so clean you?d think they are a natural fit. Having the lights recessed into the tub not only looks good, it helps keep them safe from all the trail gremlins. |
|||||||
Purchase / Vendor Info
|
| Vendor Name: | Military Lights |
| Phone: | 1-850-510-1405 |
| Contact Person: | John Booth |
