 |
||
| > Reader's Photo OX5 by Lockheed Martin |
||
 |
||
| • ADVERTISE WITH US | ||
| • WHO IS MOAB JEEPER? | ||
|

Home > Jeep Articles > Technical & Installation - Body Interior / Exterior > D30 Upper/Lower Ball Joint Replacement |
||||||||||||||||||||||||||||||||
 |
||||||||||||||||||||||||||||||||
|
D30 Upper/Lower Ball Joint ReplacementArticle written by Moab ManDate Added: 05/10/2006 Before we get into this, let me share a few terms that you might come across. |
|
Upper Ball Joint - Commonly referred to as "upper ball stud" Lower Ball Joint - Commonly referred to as "lower ball stud" Why is this important? If you are using a manual to look any of this up it will save you a bit of frustration. So what is it called? If you go into any auto parts store it is in my experience most commonly referred to as upper/lower ball joint. Now lets get started. |
|
Installation | |
|
1. Break lug nuts loose and then lift and support the axle on a jackstand.
|
|
|
2. After pre-soaking the 3 12-point bolts with a rust penetrater, carefully remove them with a 12-point wrench or socket. Trying to remove with anything other than a 12-point will round the heads.
|
|
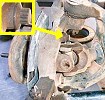
3. With the 3 12-point bolts removed, carefully slide the hub bearing assembly and axle shaft out, leaving just steering knuckle attached to the upper/lower ball joints.
|
|
|
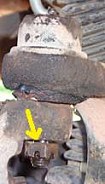
4. Remove the cotter pins/castle nuts from the upper and lower ball joints. |
|
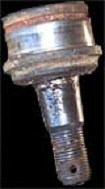
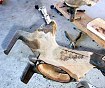
5. Using a pickle fork, separate the steering knuckle from the ball joints shaft. Jeep recommends separating the steering knuckle from the ball joint by using a brass hammer to strike the steering knuckle.  In the picture the silver shaft is from the u-joint. It should not have come out of the ball joint; this could mean either the ball joint was bad or it simply was pulled apart by the pressure holding the shaft. In the picture the silver shaft is from the u-joint. It should not have come out of the ball joint; this could mean either the ball joint was bad or it simply was pulled apart by the pressure holding the shaft. |
|
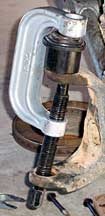
6. Using a ball joint press, press the ball joints out of the steering knuckle. |
|
7. After pressing the old joints out, press the new ball joints in. It will take a fair amount of pressure to press the new joints in, so take your time and ensure they are straight. |
|
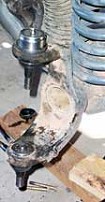
8. With both ball joints installed, replace the steering knuckle, castle nuts and cotter pins.
Torque Upper castle nut: 75 ft. lbs. Lower castle nut: 80 ft. lbs. |
|
|
9. Reinsert the axle shaft through the steering knuckle into the axle tube. When you reach the internals you will need to rotate the axle shaft until it slips into place. While we had the shafts out we took the opportunity to replace the axle shaft u-joints. |
|
|
10. Reinstall the 3 12-point bolts.
Torque Hub bearing to steering knuckle 12-point bolts: 75 ft. lbs. |
|
|
11. With the rotor back in place, here it is complete. |
|
Installation IssuesWhy is this important? If you are using a manual to look any of this up it will save you a bit of frustration.So what is it called? If you go into any auto parts store it is in my experience most commonly referred to as upper/lower ball joint. Now lets get started. |
|

|
Final ThoughtsThis is not that difficult of a job, for even the novice, provided you have access to basic tools and a pickle fork. I would plan on this being an afternoon job until your capabilities become more capable. |
