 |
||
| > Reader's Photo OX5 by Lockheed Martin |
||
 |
||
| • ADVERTISE WITH US | ||
| • WHO IS MOAB JEEPER? | ||
|

Home > Jeep Articles > Technical & Installation - Engine / Drivetrain > OX Locker |
||||||||||||||||||||||||||||||||||||||||||||||||||||||||||||||
 |
||||||||||||||||||||||||||||||||||||||||||||||||||||||||||||||
|
OX LockerArticle written by Moab ManDate Added: 05/04/2006 I'm going to say it right up front; The Ox locker is a smooth shifting, bomb proof locker. It is almost zero maintenance and incorporates many features not found on other lockers. |
|
 The Ox Locker is a selectable locker offering both a fully open and fully locked differential. A simple shift of the lever takes you from a smooth daily driver to a serious off roader. Many of you know that OX Locker was around before but disappeared for a while. As unfortunate as that was, I'm thrilled to say the company has come back bigger and stronger with a better OX Locker than ever before. The Ox Locker is a selectable locker offering both a fully open and fully locked differential. A simple shift of the lever takes you from a smooth daily driver to a serious off roader. Many of you know that OX Locker was around before but disappeared for a while. As unfortunate as that was, I'm thrilled to say the company has come back bigger and stronger with a better OX Locker than ever before. If you're familiar with the original OX Locker, there were complaints about the cable actuation and the locker not staying engaged. The biggest problem seemed to be from people NOT FOLLOWING THE CABLE SETUP DIRECTIONS! OX Products has continued to refine the locker by adding four springs in the shifting collar of the locker. These four springs help to drive the collar into the unlocked position in the event of a broken cable. This is perfect for the daily driver wheeler. While they were improving an already rock-solid product, OX decided to add one more spider gear to the inside of the locker to help disperse the load. Any other locker on the market uses only three spiders, but this is simply one of those times where more IS better. For the overall construction of the locker, I have to defer to the comments of my mechanic who does all my gear and locker work. He stated that this is simply the heaviest, solid, most overbuilt (in a good way) locker he has laid his hands on. It so impressed him that he changed his mind on the locker he was planning to install in his own Jeep. |
||||||||||
|
Installation | |||||||||||
|
1. Read the instruction from cover to cover and make sure you understand all of it before starting. IMPORTANT: We cannot stress enough that any time gears are going to be removed it should only be done by an experienced mechanic skilled in properly setting up gears. Recommendation: We also recommend that a Master Install Kit is purchased and two new seals for the axle shafts. When you're in this far, installing new equipment, you don't want to spend all this effort and money using worn components. The instructions from OX Locker are some the best we have seen for any product. Steps are laid out well, and the accompanying pictures really put the icing on the cake. Follow along as we walk through the install of our OX Locker. Although it was pretty simple, please leave it to an experienced mechanic. |
|||||||||||
|
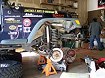
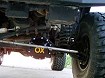
2. Support the axle |
|||||||||||
|
3. Remove the tires, tie rod, differential cover & axle shafts |
||||||||||
|
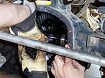
4. Disconnect front driveshaft |
|||||||||||
|
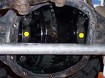
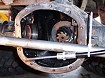
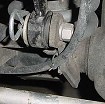
5. Bearing caps (yellow dots) need to be removed along with the races under the caps. |
||||||||||
|
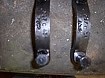
6. Mark the caps prior to removal so you know top from bottom and left from right. We used a small punch to make a mark on the upper outside corner of each cap. Keep the races matched with their respective caps and oriented correctly (top from bottom & right from left). |
||||||||||
|
7. Using a case spreader or a couple carefully placed pry bars we remove the carrier.  This would have been much easier if that tie rod were out of the way like we said above. This would have been much easier if that tie rod were out of the way like we said above. |
||||||||||
|
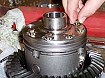
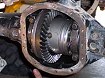
8. With the carrier out we have to transfer the ring gear, install the four springs in the OX and install some bolts into the Ox Locker (use Loc-tite). |
||||||||||
|
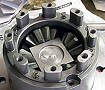
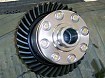
9. Isn't she pretty. |
||||||||||
|
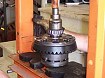
10. New bearings are installed on the locker, pinion and crush sleeve. |
||||||||||
|
11. Since we were in this deep we replaced our axle seals. These seals do not come with the locker. |
||||||||||
|
12. Working with a rubber mallet to properly seat the locker, we installed the races, caps and crushed the pinion crush sleeve. |
||||||||||
|
13. The "paint" is applied and the gears are spun to allow a pattern to develop. Reading this pattern will tell the gear installer what adjustments need to be made to get proper pinion and gear mesh. This is where the gear guy earns his money and proves his worth. |
||||||||||
|
14. After making the shim adjustments to achieve the right pattern on our gears, we installed the diff cover and cable. |
||||||||||
|
15. The diff cover itself is an equally beefy piece. It is constructed out of thick wall steel so there is no need for a diff guard, and it has a drain plug in the bottom. Anyone who has changed gear oil more than a couple times will love that feature. |
|||||||||||
|
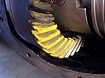
16. The cable is incredibly beefy and we recommend following the suggested routing (here it is again) in the directions (please use some common sense here and don't route the cable where it will contact the tire or get pinched in the spring). We would add that due to the "beef" of this cable, it does take some manhandling to get it in place; but don't worry, it isn't going to break. |
|||||||||||
|
17. As the cable makes it the upward bend, it comes into contact with the swaybar connecting point. For the longevity of your cable, We suggest putting a protective sleeve over the cable to prevent wearing through the cable housing. |
||||||||||
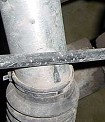
|
18. You can see where the cable is rubbing against the shock body. We would suggest a protective sleeve here as well. |
||||||||||
|
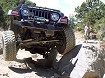
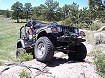
19. The best part of any install is getting to play with it. |
||||||||||
|
20. To date we've rode this OX through the rocks of Utah, Colorado, Wyoming, & Nevada with no problems or complaints. |
||||||||||
Installation IssuesThe cable and shifter are installed (in part) before and in conjunction with installing the differential cover, but we want to mention a few important points of significance to make life easier.As we said at the beginning, READ THE INSTRUCTIONS! Following the instructions for installing the cable is a must, or the locker will not shift. What we found in our highly unscientific, impromptu field test is that every person assembling the cable into the shifter and the differential cover wanted to screw the cable all the way in resulting in the locker not shifting. However, when the directions were followed for setting up the cable/shifter, the locker engaged/disengaged flawlessly each and every time. Although not really issues, we felt these two points needed to be mentioned. |
|||||||||||
|
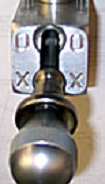
Final ThoughtsThe locker engages/disengages flawlessly. Shifting the locker is as simple as lifting (pulling up) the shifting cup to the knob and sliding the lever from "O" open back to "X" Locked.Another nice feature is that the knob will screw down into the shifting cup preventing "accidental" shifting of the lever. I find this feature handy in keeping people from playing with lever. |
||||||||||
Purchase / Vendor Info
|
| Vendor Name: | OX Locker |
| Address: | 440 S. Pinellas Ave Tarpon Springs, FL 34689 |
| Phone: | 727-230-7803 |
| E-Mail Address: | |
| Website: |
