 |
||
| > Reader's Photo OX5 by Lockheed Martin |
||
 |
||
| • ADVERTISE WITH US | ||
| • WHO IS MOAB JEEPER? | ||
|

Home > Jeep Articles > Technical & Installation - Body Interior / Exterior > ARB Bull Bar |
||||||||||||||||||||||||||||||||||||||||||||||||||||||||||||||
 |
||||||||||||||||||||||||||||||||||||||||||||||||||||||||||||||
|
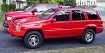
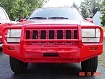
ARB Bull BarArticle written by Adventure BobDate Added: 05/04/2006 Grand Cherokees are becoming less and less expensive. As they do, they become good candidates for wheeling vehicles. |
|
Power everything, air and V-8 for around $4000! With the addition of a baby seat, the Gofer is quickly becoming the choice for family wheeling. Still, some things need to be addressed before my family truckster is ready to hit the trail. If you?ve ever been wheeling with someone in a Grand Cherokee, you?ve probably been frustrated when they got stuck and you realized there are absolutely no solid points on the vehicle for recovery. Hook a strap to the factory ?impact coverette? and you?ll pull the front end completely off the Jeep. To avoid being ?that guy?, we contacted the folks at ARB USA for some help making the Gofer?s front end trail ready. They sent us a shiny new ARB Winch Ready Bull Bar and a big bag of parts. Some friends and I installed the Bull Bar on my 318-in, V-8 powered 1996 Grand Cherokee in a little under 2 ½ hours. |
||||||||||
|
Installation | |||||||||||
|
1. Remove the grill cover and the factory bumper cover. |
|||||||||||
2. Remove the fog lights if installed. I found this unnecessary on my Jeep. I found this unnecessary on my Jeep. |
|||||||||||
|
3. Remove the horns and zip tie them out of the way. |
||||||||||
|
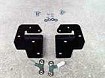
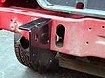
4. Mount the chassis brackets(PN 3751578) and the captive nuts (PN 3193508). The chassis mount brackets go into the opening to the outsides of the frame spars. Tightening the bolts provides your horizontal alignment for step 5. |
||||||||||
|
5. Mark the holes from the front of the bracket (PN 3751578) |
|||||||||||
|
6. Remove the bracketry |
|||||||||||
|
7. Drill the ½ inch holes where you marked them. I recommend drilling a pilot hole and using a Uni-Bit to widen the holes to the required size. |
|||||||||||
|
8. Install the lower bolts into the bracket (PN 5193508) |
||||||||||
|
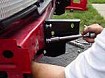
9. Install the large bolts from the front of the vehicle and into the captive angle bracket (PN 3751585) Do not tighten any of the bolts until you can get them all started. |
||||||||||
|
10. Install the top inner bolt into the captive nut plate (3193508) and tighten all four bolts. |
|||||||||||
|
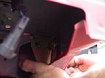
11. Drill an 8mm hole for the vapor canister shield bolt. Be careful not to punch through the vapor canister! It?s thin and plastic Be careful not to punch through the vapor canister! It?s thin and plastic |
||||||||||
|
12. Install the vapor canister shield (PN 3193507). On the 96, the vapor canister cannot be rotated |
|||||||||||
|
13. Install the grill |
|||||||||||
|
14. Install the bumper on the Chassis mount brackets. |
|||||||||||
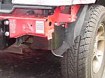
15. Install the bumper, line up the holes and tighten the bolts This is not a light bumper. Use at least two people. This is not a light bumper. Use at least two people. |
|||||||||||
|
16. Install the horns. |
|||||||||||
|
17. Install and connect the new indicator lights in the bumper. |
|||||||||||
|
18. Bolt on the plastic inner guards |
|||||||||||
|
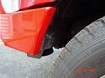
19. Trim the original fender liners even with the bottom of the new Bull Bar |
||||||||||
Installation IssuesI chose to install just the bumper without a winch at this time. I did this for a couple of reasons. First of all, while taking pictures and getting everything lined up, I didn?t want to deal with the added weight. Second, our bumper has to come back off for paint, and I didn't want to have to remove the winch for that. For those of you not installing the winch, the instructions begin at step 10. Now that everything is attached and where it should be, installing a winch later should be easy.The bumper went on smoothly. I was impressed that getting this type of protection only requires drilling four ½-inch holes. The ARB bracketry really beefs up the stressed areas and gives a very sturdy, solid mounting surface. Recommendations to ARB: Several (not all) of the brackets are stamped with the part number for easy identification, This is quite helpful, and I recommend stamping all the parts. The vapor canister ?guard? does not necessarily provide protection. It is a complication I will have to live with until I can find a place to move the canister. The instructions are written and the hardware is packaged as if everything will be installed at once. This will probably not always be the case. I would recommend packaging the hardware kit separately as ?Bumper Installation? and ?Winch Installation?. This would make the rather large amount of mounting hardware less daunting for the do-it-yourselfer. |
|||||||||||
|
Final ThoughtsThis great looking product provides real protection for the front of your Grand Cherokee. I would highly recommend this as your first purchase if you plan to wheel your Grand. It provides solid points for pulling and rock protection for the front of your vehicle. The installation was easy, and it makes a Grand look much better. It is well worth the money. |
||||||||||
Vendor ResponseARB has contacted MoabJeeper Magazine to inform us that they will be taking our recommendation and stamping all parts with their appropriate part number for easier identification. |
|||||||||||
Purchase / Vendor Info
|
| Vendor Name: | ARB USA |
| Address: | 720 SW 34th Street Renton , WA 98055-4814 |
| Phone: | (425) 264 1391 |
| E-Mail Address: | |
| Website: |
