 |
||
| > Reader's Photo OX5 by Lockheed Martin |
||
 |
||
| • ADVERTISE WITH US | ||
| • WHO IS MOAB JEEPER? | ||
|

Home > Jeep Articles > Technical & Installation - Suspension > Pro Comp Adjustable Track Bar |
||||||||||||||||||||||||||||||||||||||||||||||
 |
||||||||||||||||||||||||||||||||||||||||||||||
|
Pro Comp Adjustable Track BarArticle written by Adventure BobDate Added: 05/02/2006 As the Gopher (96 Grand Cherokee with a V-8) gets older, more of the stock Jeep parts are wearing out. |
|
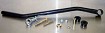
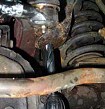
While driving, we began to notice a popping sound. After much hunting, we found it to be the ball joint end of the stock track bar. Sticking with my motto of not replacing expensive broken factory Jeep parts with more expensive factory Jeep parts, we obtained a Pro Comp adjustable track bar. For comparison the stock part is $168 and the Pro-Comp track bar is about $180 depending on where you get it. This conversion was done for two main reasons. The Pro-Comp part eliminates the ball joint, and it?s adjustable for future mods. As we all know, ball joints aren?t rebuildable on the trail, and carrying a whole spare track bar is out of the question. The box arrived with all the cool parts including grade-8 hardware and a plated heim and locknut. After a quick inventory, we tore into the Gopher. |
||||||||||||
|
Installation | |||||||||||||
1. Prior to beginning, drive your vehicle straight onto a level, flat surface and stop where you?ll be doing the modification. This will center the axle properly under the vehicle. This mod alters your vehicle in such a way that stock parts will no longer fit. Ensure you understand this prior to starting the installation. This mod alters your vehicle in such a way that stock parts will no longer fit. Ensure you understand this prior to starting the installation. |
|||||||||||||
|
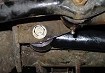
2. Remove the old track bar by removing the upper and lower bolts. If the ball joint is shot, you may have to use a pickle fork to keep the stud from spinning. Do not lift or move the vehicle once the old track bar is removed |
|||||||||||||
|
3. Drill the hole on the bottom of the drivers side track bar mount out to 5/8?. |
||||||||||||
|
4. Install the heim joint and lock nut in the Pro-Comp track bar, and adjust the length to roughly equal to the old track bar. |
||||||||||||
|
5. Install the supplied bushings and sleeve in the track bar. |
|||||||||||||
|
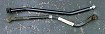
6. Install the fixed mount end of the track bar (passenger side) with the 7/16 bolt, nut, and washers. Torque to 55ft/lbs. The only wrench that fits inside the small bracket for the 7/16 nut is a box end. The only wrench that fits inside the small bracket for the 7/16 nut is a box end. |
||||||||||||
|
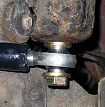
7. Install the offset washers (the thicker ones) on either side of the Heim Joint and insert the 5/8? bolt through the washers and heim. |
|||||||||||||
|
8. Make final adjustments of the heim joint to allow the bolt to slide into the newly drilled hole without binding. |
|||||||||||||
|
9. Install the nut and washer, torque to 120 ft/lbs, and test drive your Jeep! |
||||||||||||
|
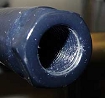
Installation IssuesThis installation is pretty straight forward. Removal of the stock Jeep track bar was the hardest part due to limited working room at the ball joint end. Pro Comp?s instructions are clear and easy to follow with good diagrams to help the novice figure out where everything goes. We did, however, have some minor issues with the Pro Comp kit.The first item of concern is that the track bar had powder coat in the threaded end of the bar. This made it nearly impossible to install the heim joint. We have a large selection of taps and were able to clean the threads, but many potential customers will not have a tap this big. During the coating process a dummy slug should be inserted to prevent this. Second, the instructions and parts list call for a 7/16? X 2 3/4? grade 8 bolt. What came in the kit was a 7/16? X 2 15/16? bolt. During the installation, this became really important when using a box end wrench to hold the nut in the very small opening at the passenger side of the track bar. Once this incorrect bolt is torqued, it?s too long to allow you to remove your wrench; it?s stuck between the bolt and the axle tube. We went out and purchased the appropriate length bolt which does allow you to torque the bolt to spec and remove your wrench. This appears to be a supplier issue, and we only mention this because we?ve had other readers tell us that they had the same frustrating problem with this part. Many have overcome the issue by cutting the bolt, but we do not recommend cutting the grade 8 hardware. Lastly, the instructions in illustration 2 call for the use of 2 5/8 AN washers (small OD). These washers are in fact the same outer diameter (OD) as the other 5/8 washer and can be distinguished because they are thicker, not smaller OD as specified. |
||||||||||||
Final ThoughtsWhile all of these issues do not affect the quality of the kit, it is confusing when the parts don't match exactly. All in all this is a good kit that, so far it has performed well. With the correction of the minor issues we?ve identified, this is a very reasonable kit for around $180. |
|||||||||||||
Vendor ResponseI have received the official word from engineering and production that both of the issues that you encountered have been addressed. The proper 2.75" bolt has been provided by our hardware vendor and the threaded end of the bar will be capped before powder coat. Existing units in inventory were inspected and prepared for a clean installation. Thank you for the professional presentation and the clear cut solutions to the minor and rather annoying installation issues. Best Regards, Jeff Blakely |
|||||||||||||
Purchase / Vendor Info
|
| Vendor Name: | Explorer Competition Products |
| Address: | 2758 Via Orange Way Spring Valle, CA 91978 |
| Phone: | 619-216-1444 |
| Contact Person: | Robert Bruce |
| E-Mail Address: | |
| Website: |
 Our
Thank You's!
Our
Thank You's!
We?d like to thank Amanda Caldwell and Jeff Blakely for working with us on this project and for their commitment to quality for you, our readers.
