 |
||
| > Reader's Photo OX5 by Lockheed Martin |
||
 |
||
| • ADVERTISE WITH US | ||
| • WHO IS MOAB JEEPER? | ||
|

Home > Jeep Articles > Technical & Installation - Body Interior / Exterior > T&T Customs Bolt On Tube Fenders |
||||||||||||||||||||||||||||||||||||||||||||||||||||||||||||||||||||||||||
 |
||||||||||||||||||||||||||||||||||||||||||||||||||||||||||||||||||||||||||
|
T&T Customs Bolt On Tube FendersArticle written by SuaveDate Added: 05/02/2006 Yes, they really are bolt on! |
|
 Ok great, so now you have a Wrangler, and you start thinking about what modifications you can do to get it trail ready. Most of the time new axles, lockers, suspension, and tires go on first. It would be mind numbing to have all that money invested in upgrades that improve your rig?s capability but be afraid to scratch it up or dent it. Ok great, so now you have a Wrangler, and you start thinking about what modifications you can do to get it trail ready. Most of the time new axles, lockers, suspension, and tires go on first. It would be mind numbing to have all that money invested in upgrades that improve your rig?s capability but be afraid to scratch it up or dent it. Here at MoabJeeper we decided to try something a little different. We outfitted our TJ with body armor first. You?ve read in some of our previous articles that this TJ has sliders, rear quarter panel armor, gas tank, and steering box protection. It came to our attention, however, that the front of the rig needed some protection as well, so we decided it was time to add some tube fenders to our TJ. The question was which ones. Of course we could?ve gone to a custom shop to get them built and installed, but we?re kind of stubborn. We also knew that we could take a sawzall to the fenders and add some popular aftermarket fender flares. Being the conservative people we are, we wanted to install a set of tube fenders that would not require us to cut away the old fenders. We wanted a full replacement fender. This led us to This & That Customs (T&T Customs) and their new TJ Full Replacement Tube Fenders. That?s right I said full replacement. You literally remove your old fenders and replace them with these. We were able to land the first set off of the production line to give you an idea of how well they can be installed by the ?do it yourselfer?. For anyone somewhat mechanically inclined, the installation of these fenders should be easy and very straight forward. The fenders come with complete instructions and all necessary hardware. The instructions are thorough and easy to understand. The instructions recommend the fenders be placed and fitted prior to prepping and painting. They also warn you that if you have custom sliders on your rig you may have to do some minor trimming on them because the replacement fenders have a much larger wheel opening that the stock fender/flare combination. Make sure you retain the factory hardware from your removal process as some will be reused. |
||||||||||||
|
Installation | |||||||||||||

|
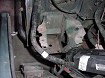
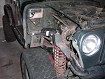
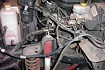
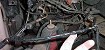
1. Remove the battery, fuse box, and air induction system. |
||||||||||||
|
2. Remove the wiring harnesses from both sides of the fenders and all of the retaining clips. |
|||||||||||||
3. Remove the electrical connectors from the horns and washer pump motors.  Be prepared to put the washer bottle somewhere the fluid can be captured. Be prepared to put the washer bottle somewhere the fluid can be captured. |
|||||||||||||
|
4. Unbolt the washer bottle from the fender and remove the rubber supply lines from the washer fluid bottle. |
|||||||||||||
|
5. Remove the factory battery tray, and unplug the sensor in the bottom. |
||||||||||||
|
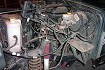
6. Remove the fender-to-firewall supports on the both sides of the vehicle. Do this BEFORE you unbolt the fenders from the cowl (we learned that the hard way).
|
|||||||||||||
|
7. Remove the little vacuum canister at the bottom of the passenger fender. this particular TJ does not have air conditioning to contend with, but the instructions guide the installer in reforming AC lines appropriately. |
|||||||||||||
|
8. Remove the emissions equipment from the drivers side. This Jeep has a manual transmission, but the instructions also provide steps for the transmission control module on automatics. |
||||||||||||
|
9. Remove horn assemblies. All accessories from both sides of the fenders have now been removed. |
|||||||||||||
|
10. Unbolt the original fenders in three separate places. One at the fire wall, and two on the grill. |
||||||||||||
|
11. Slide the fender on the passenger side and bolt it in place starting with cowl and then the grill. |
||||||||||||
|
12. Install the provided battery tray support. It fits nicely over the studs on the firewall and against the inner fender. |
|||||||||||||
|
13. Mark the two holes to drill in the fender for the support. |
|||||||||||||
|
14. Mark holes for the vacuum canister and the fuse block assembly. |
|||||||||||||
|
15. Slide the fender on the passenger side and bolt it on starting with the cowl and then the grill. Bend the brake lines just a bit so the fender doesn?t tear into them. |
||||||||||||
|
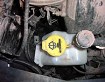
16. Install the washer fluid bottle on the inside of the driver's-side fender next to the firewall.
|
||||||||||||
|
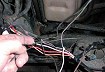
17. Locate the original connector for the pump motor for the front windshield. |
||||||||||||
|
18. Unwrap the harness to expose the two wires for the connector, and trace the ground wire (black one) to where it splits inside the harness. |
||||||||||||
|
19. Cut the ground wire at the connection point, and seal the exposed wire at the splice with the included hardware. |
|||||||||||||
|
20. Trace the other wire from the washer pump connector back to the multi pin connector from which it originated. |
||||||||||||
|
21. Retape and reharness the remaining wires while leaving the washer pump wire out.
|
||||||||||||
|
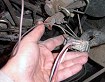
22. Connect the ground wire to the included metal ring, and secure it to the washer fluid bottle mount itself ensuring a good connection. For the purpose of getting better pictures, we did this wiring procedure with the fender off. The instructions have you put the fender on first. |
|||||||||||||
|
23. Position your horns and emission equipment, and mark for drilling. |
|||||||||||||
|
24. Remove both fenders to drill, prep, and paint as desired. We decided to paint the fenders with black Hammerite for durability. |
|||||||||||||
|
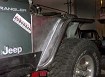
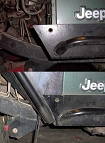
Installation IssuesThe first issue was with the driver's-side slider (T&T warned us we may have issues with aftermarket sliders). The rock slider on this side was a bit too long, so we had to trim it a little.The difference, as you can see in the two photos, was not substantial. Just trim enough to fit. We did a rough cut of the bottom of the slider to ensure we only removed what was needed. After grinding the slider down a little, the fender slid in place, with a little moving around. The last issue we had was ?what about the parking/turn signal lights?.? With a CJ and YJ, this isn?t an issue because they are located in the grill. With the TJ you can do several things. We decided to take the parking/turn signal lights off of an old CJ and install in the grill (that article will be coming soon). You don?t have to go that way; but in order to be street legal, you will need to do something with the lights. |
||||||||||||
|
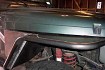
Final ThoughtsThis installation is pretty straight forward. Removal of the stock Jeep fenders was the hardest part because of all the other items that need to be removed as well. T&T?s instructions are clear and easy to follow with good diagrams to help the novice figure out where everything goes.Ok so how much is this going to set you back? The fenders retail for $596 and you?ll have to get an after market air intake system ($50-$250) if you don?t already have one. Also don?t forget to figure in after market turn signals ($10-$40 and some cutting into the grill). They're not cheap, but don?t forget you can sell your stock fenders for anywhere from $100 - $300 to recoup some of the cost. The air intake system you were going do anyway and the CJ lights look cool. So all in all it?s a win win win situation. The fenders are super beefy and look great. This Jeep only has 2.5" of lift and easily clears 33's with these fenders. We recommend this to the serious wheeler who wants the fender protection, because sooner or later YOU?RE GONNA NEED IT! |
||||||||||||
Purchase / Vendor Info
|
| Vendor Name: | This & That Customs, Inc. |
| Address: | 216 Ave. D Suite A Cheyenne, WY 82007 |
| Phone: | 307-214-7754 |
| Contact Person: | Bob Levenhagen |
| E-Mail Address: | |
| Website: |
 Our
Thank You's!
Our
Thank You's!
We?d like to thank Bob Levenhagen from T&T Customs for his immediate support and help when we called with questions. T&T Customs was eager and willing to lend a hand and was VERY receptive to our suggestions.
